Image to 3D - 3D AI generation for GameDev Experiment

Tutorial / 12 April 2024

I experimented with AI-generated 3D models to check their usability for FinalAutomata (https://www.youtube.com/@FinalAutomata) , where we need to create numerous characters (robots). Here are my key takeaways:

The fidelity and quality of the output are still lacking, especially for Hard Surface assets/characters. Here's what I found useful:

  • Using higher quality input images (with clear forms, like product design concept art or clear front lit renders) results in better outcomes.
  • Text prompts generate better results than image-to-3D conversion.
  • Segmenting your assets into parts and generating them separately allows for more detailed results for each part.
  • Retexturing with AI is a nice feature that can quickly fix imperfections in the generated color textures.
  • While AI offers retopology, it tends to eliminate details.
  • AI-generated models can be used (almost) as-is for stylized projects, particularly for props and some characters.

My approach involved:

1. Image/concept generation:

  • I used Dall-e because it allows tweaking the results using natural language. For my next experiment, I plan to combine MJ, Krea.ai, and StableDiffusion for more controlled results. 
  • Editing in Photoshop with AI-generated feature allows for precise fixes and inpainting.

3. Generating 3D from images:

  • CSM.ai worked best for me as it allowed segmentation of the front and back of specific robot parts, providing the closest likeness to the reference/concept art.
  • Some parts, like robotic eyes, separate joints, or kitbash parts, can be generated using Tripo3d.ai, 3DAiStudio.com, and Masterpiecex.com. Each generator offers slightly different results.

4. Geo Cleanup:

  • I performed retopology in Blender (using QuadRemesh or Blender's remesh tool) to fix holes, etc.
  • I smoothed in sculpt mode with the Filter Brush, added creases with the Pinch Brush, and polished with Flatten.
  • I then baked the diffuse (AI-generated color map) onto the new retopologized UVed mesh.

4. Retexturing and adding normal map details in Substance:

  • I used SubstanceSampler to create PBR materials from AI-generated color maps.
  • MJ helped generate cable textures, which were turned into PBR materials in SubstanceSampler.
  • I also used hard-surface alphas from JRO to add extra height details.


Report

Create the hair cap using Maya and Marmoset - Process Video

Tutorial / 08 February 2021

I recorded a video of creating the hair cap mesh for game characters using Maya and Marmoset.

----

The Hair Cap is basically the mesh that has the shape of the character's scalp, and plays a role of a hair coverage layer and placed under the hair cards. It's most useful for short hairstyles, which have buzzcut or fade.

I'd like to mention Jansen Turk's work, he is an amazing groom artist and I am actually recreating his workflow of making the hair caps, please check his breakdown of real-time hair creation.

The idea of this workflow is to create hair using the Interactive Grooming tool in Maya, covert these hair to tiny splines and bake them into a low poly cap mesh in Marmoset Toolbag.

As a result, we get texture maps – Alpha, Normal, Ambient Occlusion, Depth, Id and Root.

You can bake the maps in the xNormal tool or Blender as well. Please check out my blog post about other workflows of creating the hair caps for characters.

Check out my video and let me know if you have any questions in the comments.


You can buy this real-time hair asset in my Artstation store.


Report

Placing hair cards and fitting the polygon budget for realtime hair

Tutorial / 15 October 2020

I'd like to share a few aspects of my workflow of making realtime hair - how I place hair cards in Maya and how do I change (reduce) the polygon count after the model is ready.

Step 1

I work with hair cards in a smooth preview mode. You can achieve this pressing "3" in Maya.

This gives me the opportunity to make different shapes and not overwhelm myself with a lot of polygons while tweaking the card form.

As you can see - I have only a few vertices/ edges and faces to work with. It's easy to move them by selecting only few vertices/edges using the UV editor or Soft selection ("B" key).

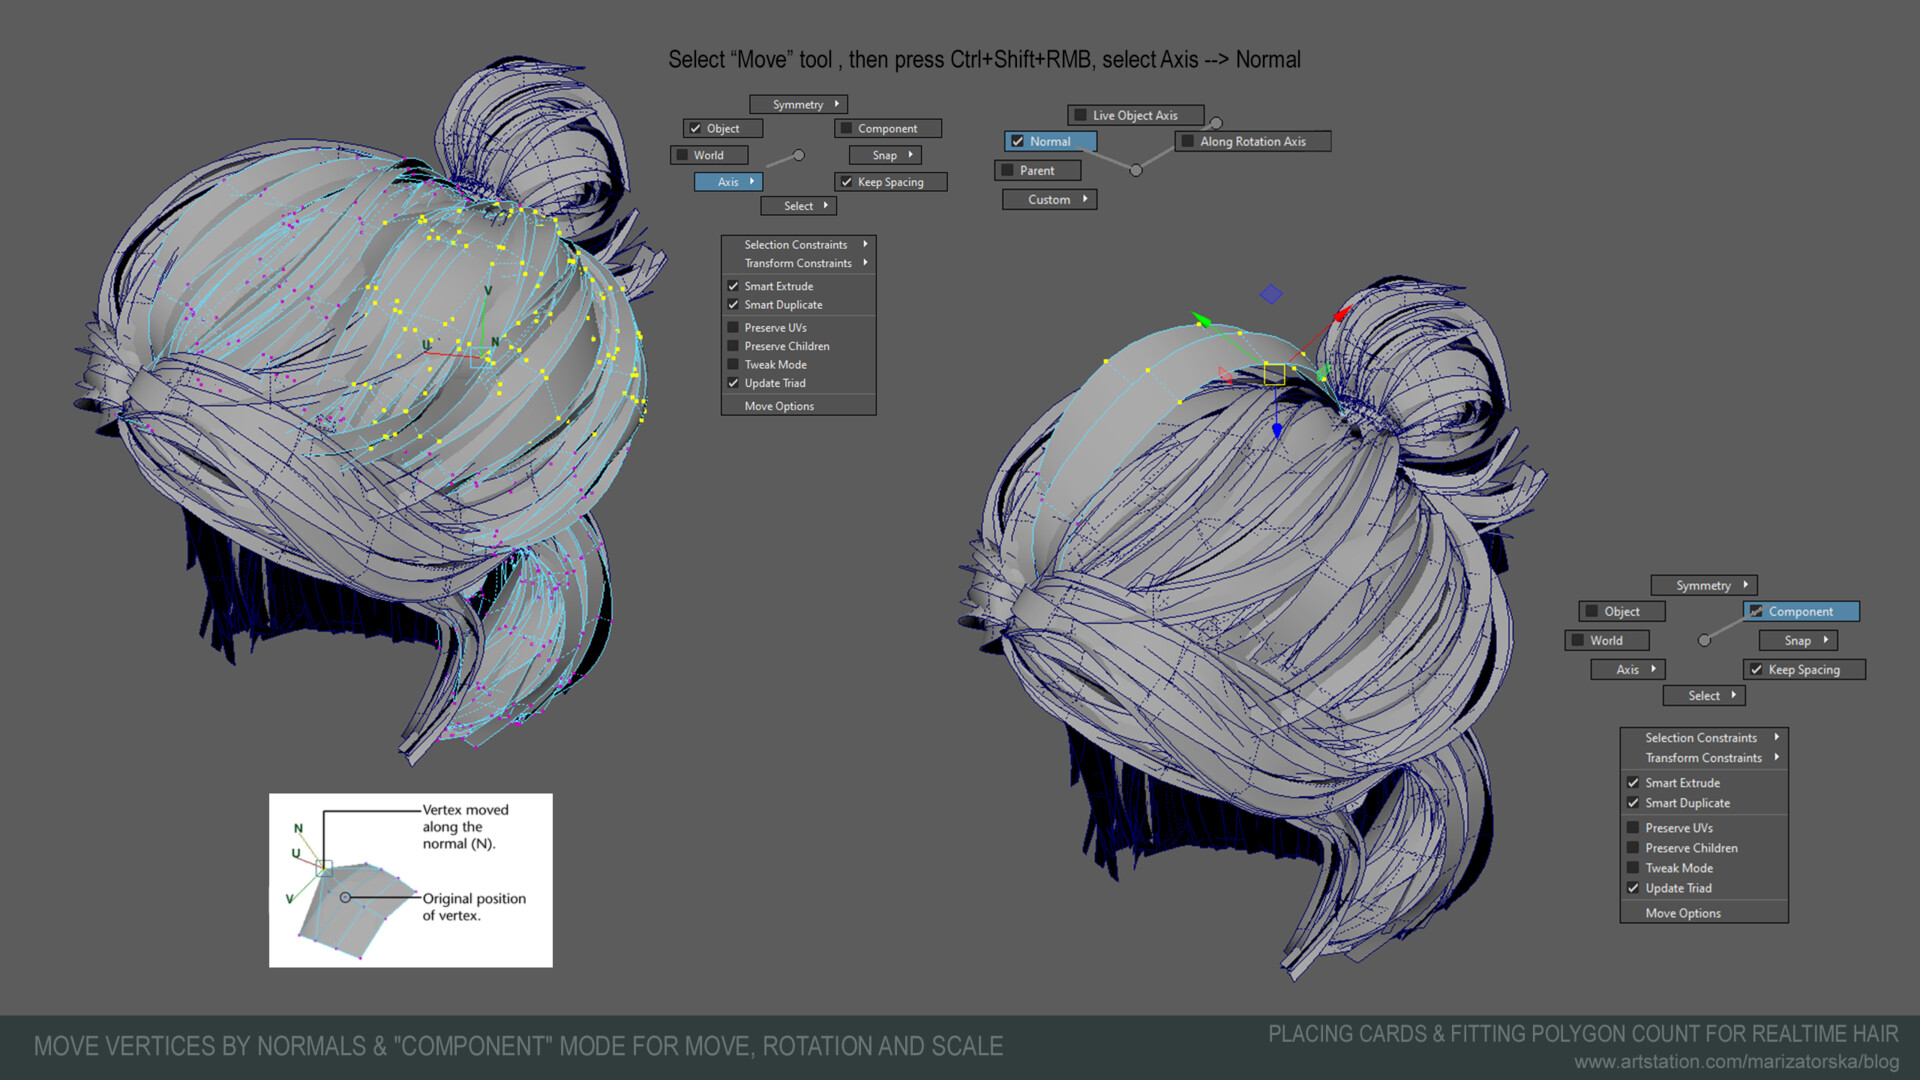
I usually set the "Component" option in the Tool Settings for Move, Rotation and Scale. And for the Move tool, I also use the "Axis - by Normals" direction to move the vertices. The latter changes the volume of the card.

Step 2

After I've done placing the haircards, I Combine the mesh into one piece and perform a Smooth operation.

I would go with the value "1" or "2". But you can experiment with that to achieve the best results.

After I've smoothed the mesh I press "1" to exit the smooth preview mode. And now we can see how the original hair geometry looks. It is very smooth and nice because we have quite a large polygon count.

*I also would like to mention, then when targeting specific polygon count I use the triangles count. Even my final 3d model will consist of quads - I like to count the triangles as this is what is commonly used in game engines and client's tech requirements.

Step 3

Now we can reduce the number of polygons of this mesh to fit our goals.

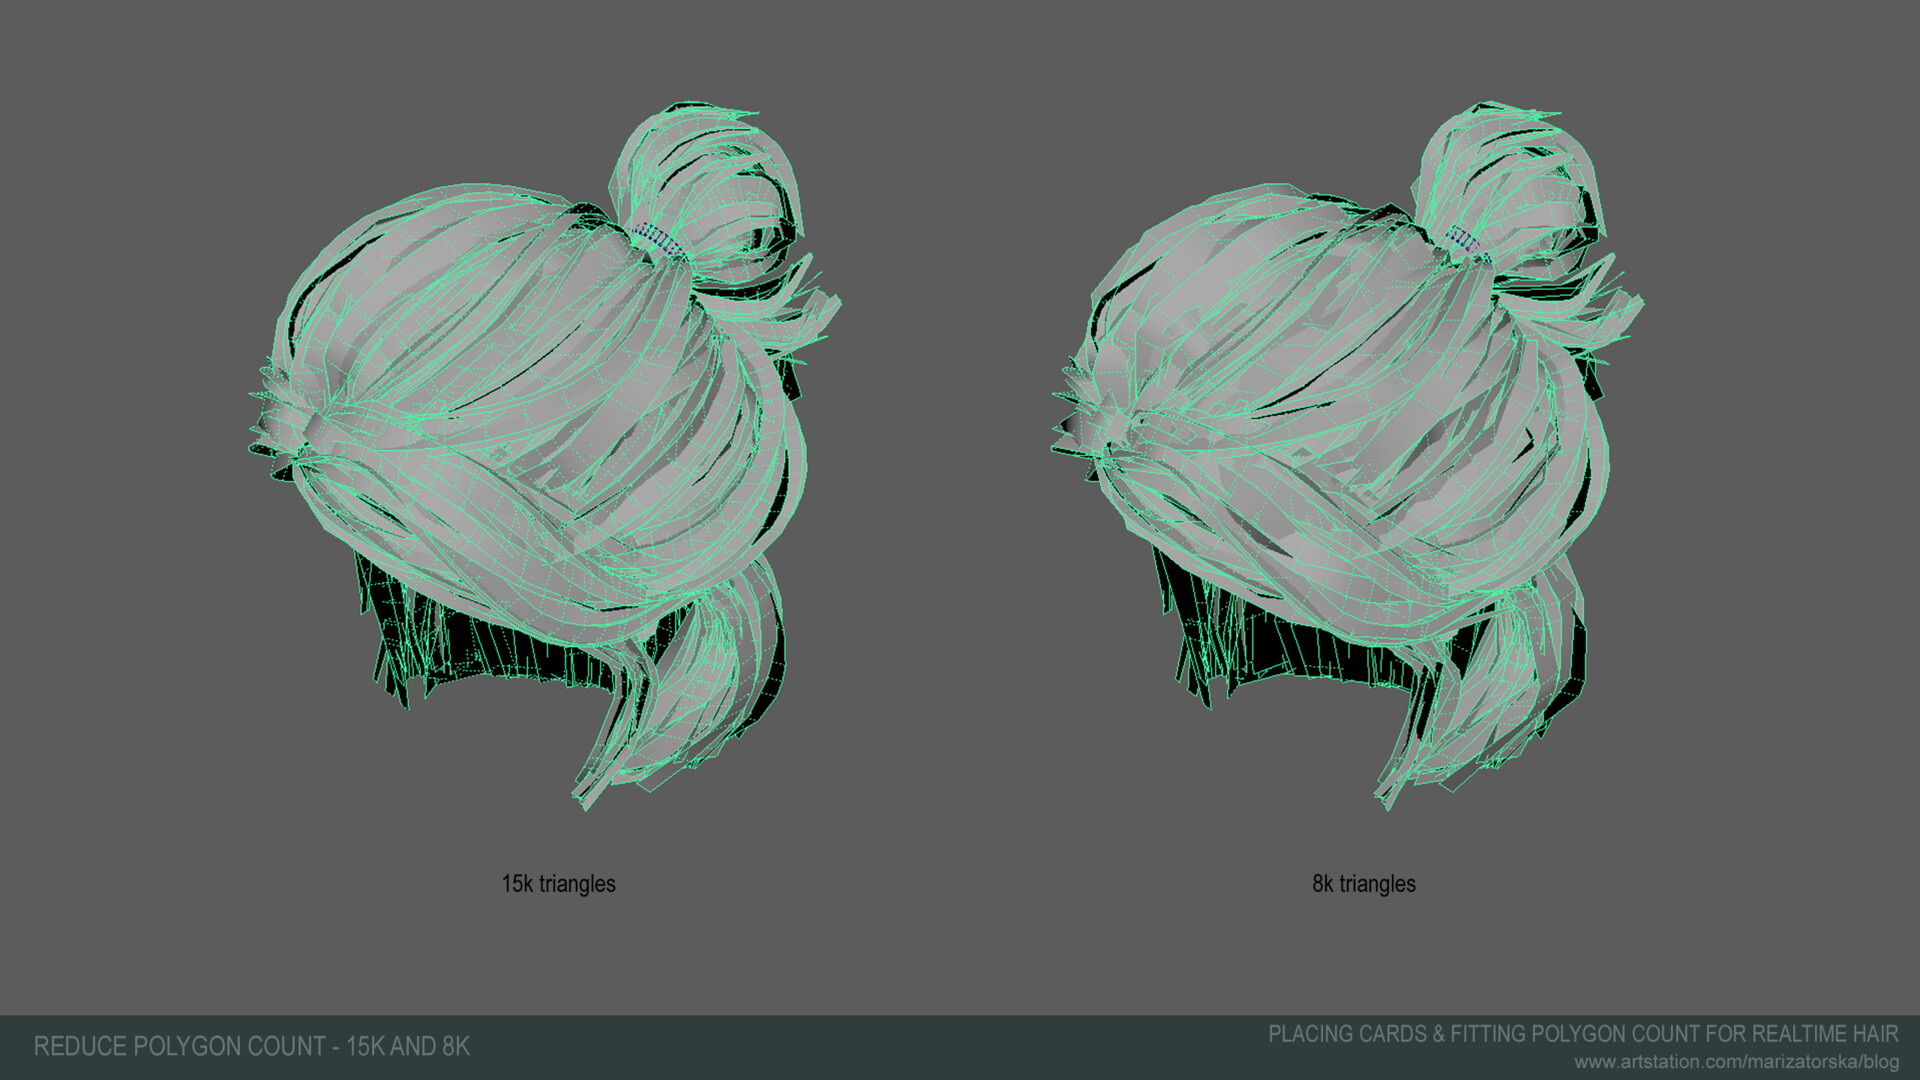
Of course, I won't be able to make this model look good in 5k triangles. But I can definitely have a few variants to look good: 15k and 30k.

There are always a few things to consider when deciding on polygon count for your mesh.

  • How close the player will interact with this model
  • What is the restriction of your game engine or graphical style? I mean, if you aim for a     photorealistic look of your game you would go for a larger polygon count. If your game is stylized - you would consider fewer polygons.

 When created this hair model I was thinking of a photorealistic project, so I would target: 15k and 30k.  And 8k just to see how bad it will look.

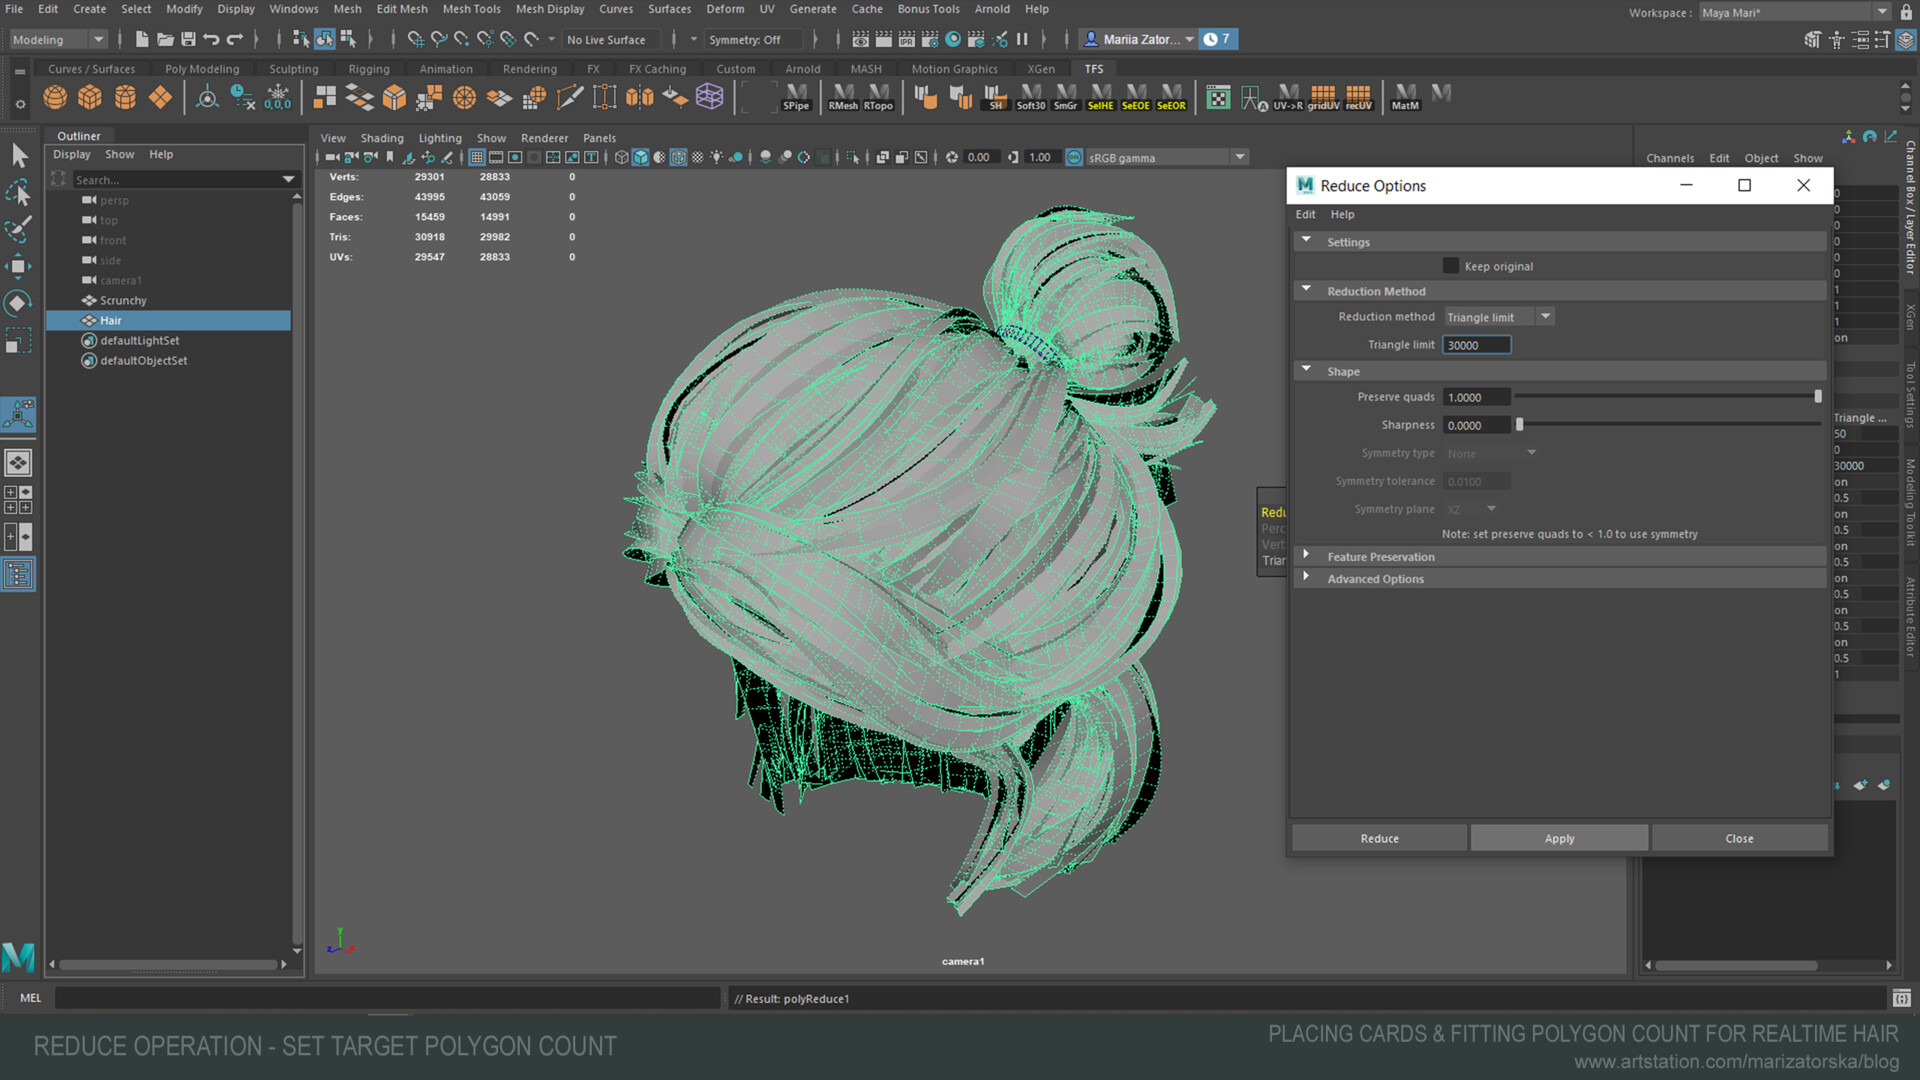
We have a solid mesh in a plane view in Maya with about 1000k polygons (I mean triangles).  Now we perform the Reduce operation.

 These are my settings. I set the target amount of triangles and leave the mesh to be in quads. We let Maya calculate it all and here we are. 


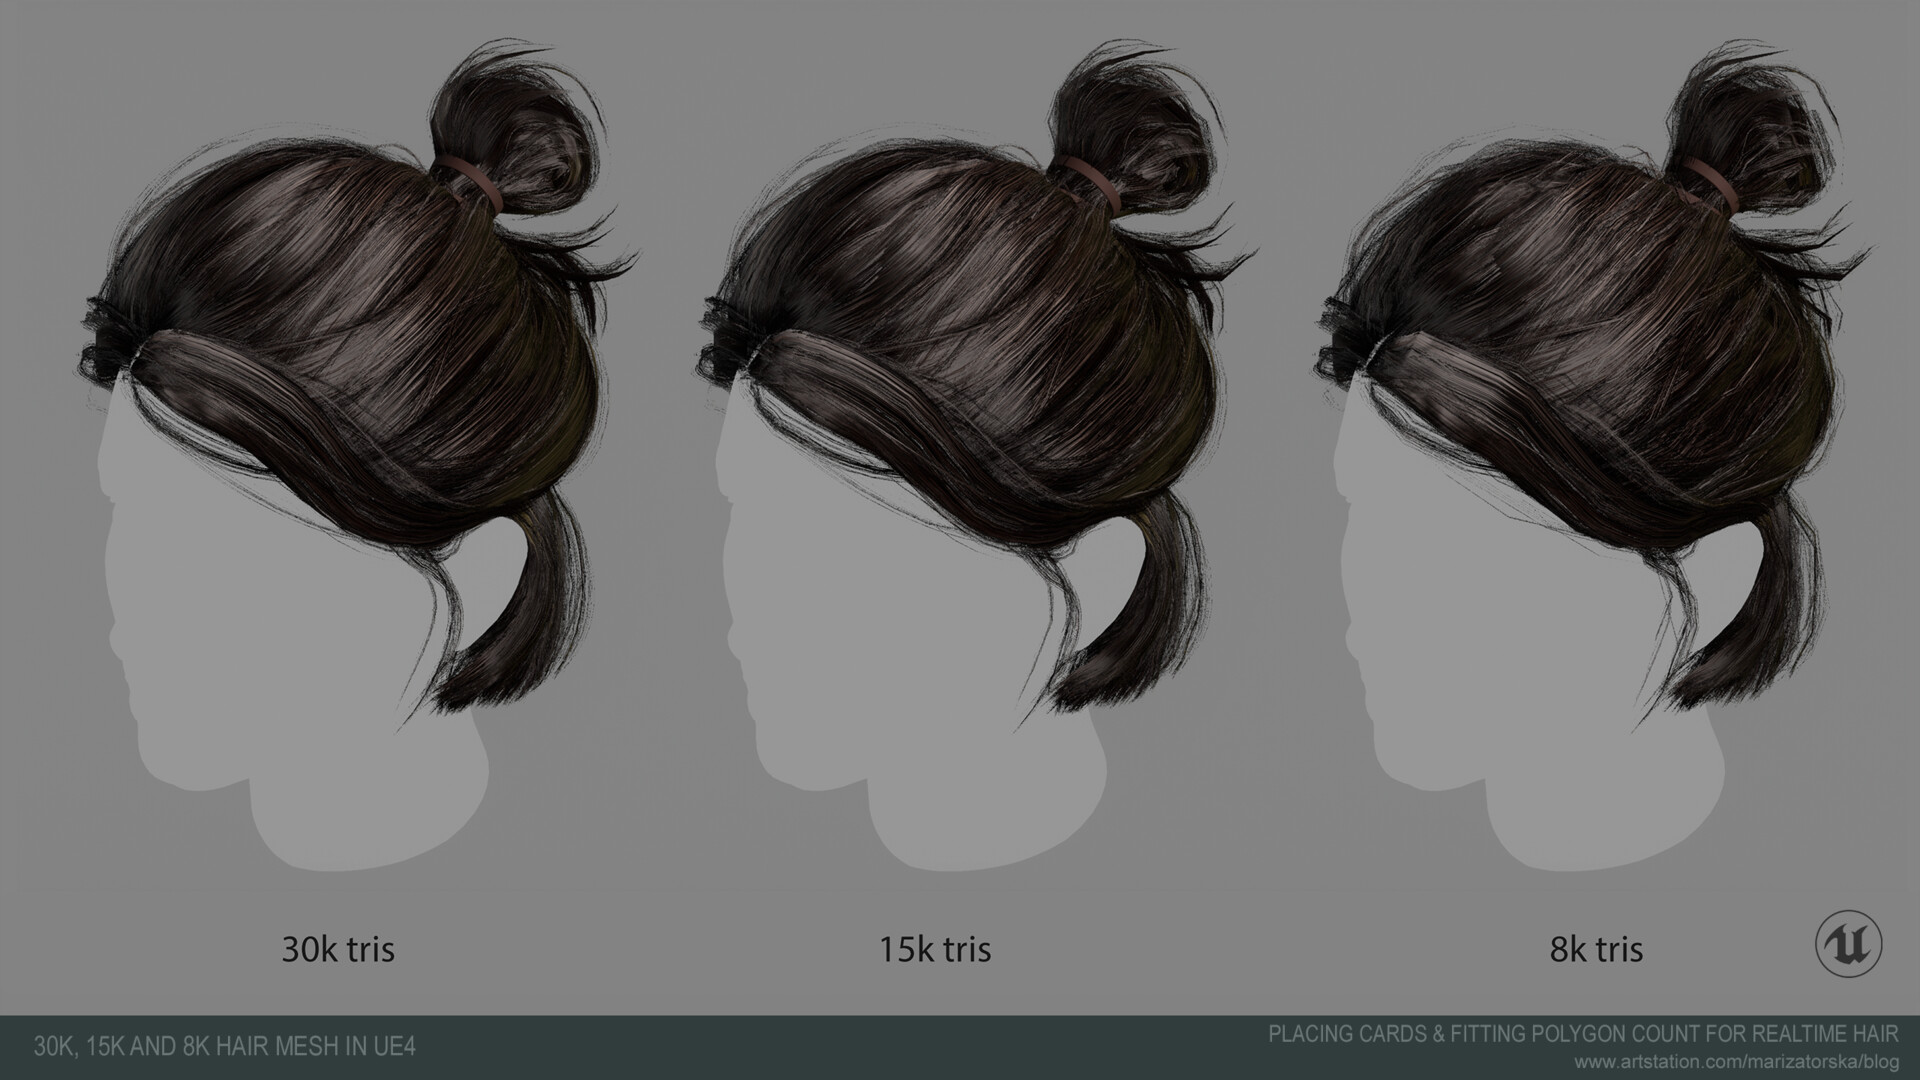
Let's see how 30k, 15k and 8k hair mesh look in Unreal Engine.


Check out other resources on this topic:

Ashley Sparling shares his AAA hair workflow and how he reduces the model's triangle count to target the polygon budget:

https://youtu.be/mzqMd9qDvjQ?t=2630


Placing hair cards in a preview mode technique showed by Sushan Manandhar

https://www.youtube.com/playlist?list=PL69P8VJxGmTsYL7FWIe2e0IK68tNew1HP


BTW, this post might be useful for those who purchased my "Ellie" Realtime Hair Asset with the source Maya file included, which allows performing the Reduce operation to fit the target polygon count.

Thanks for reading and let me know in the comments if this was helpful.

Report