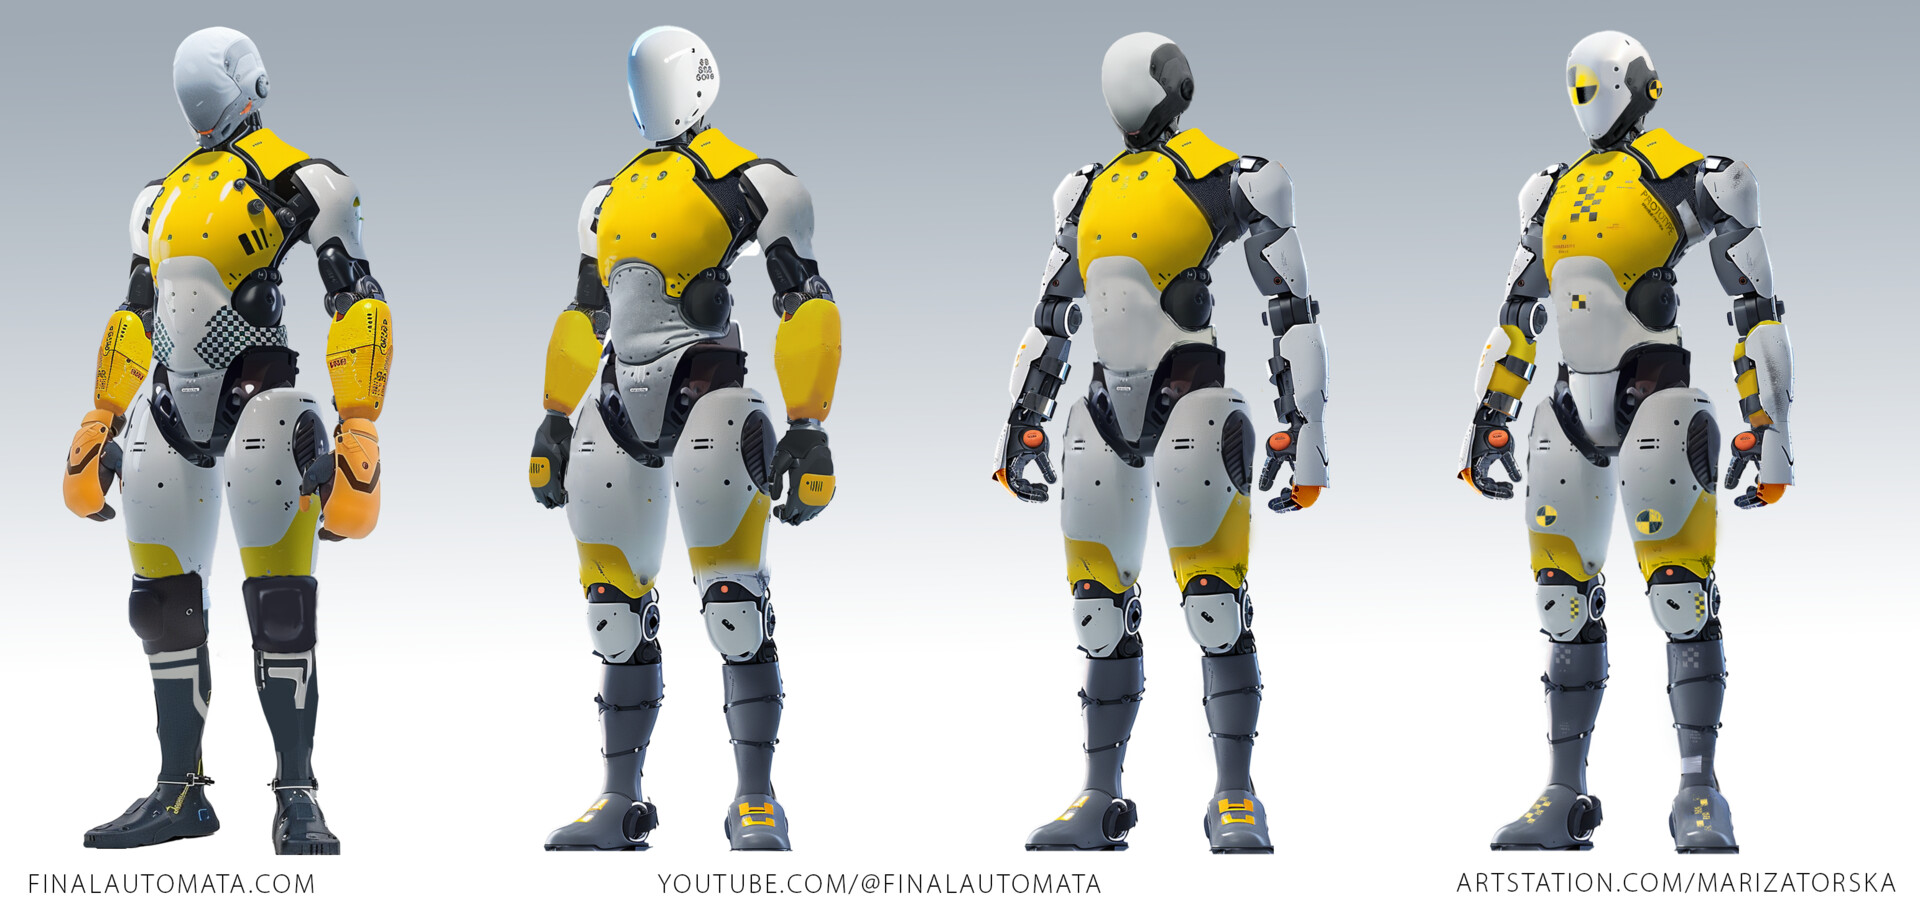
[FA UPDATE #1] ROBOT CONCEPT ART: AI tools & Photoshop / Learning Art Direction for Games

Work In Progress / 29 May 2024

┏(°.°)┛ ┗(°.°)┓ ┏(°.°)┛ ┗(°.°)┓ ┏(°.°)┛ ┗(°.°)┓ ┏(°.°)┛

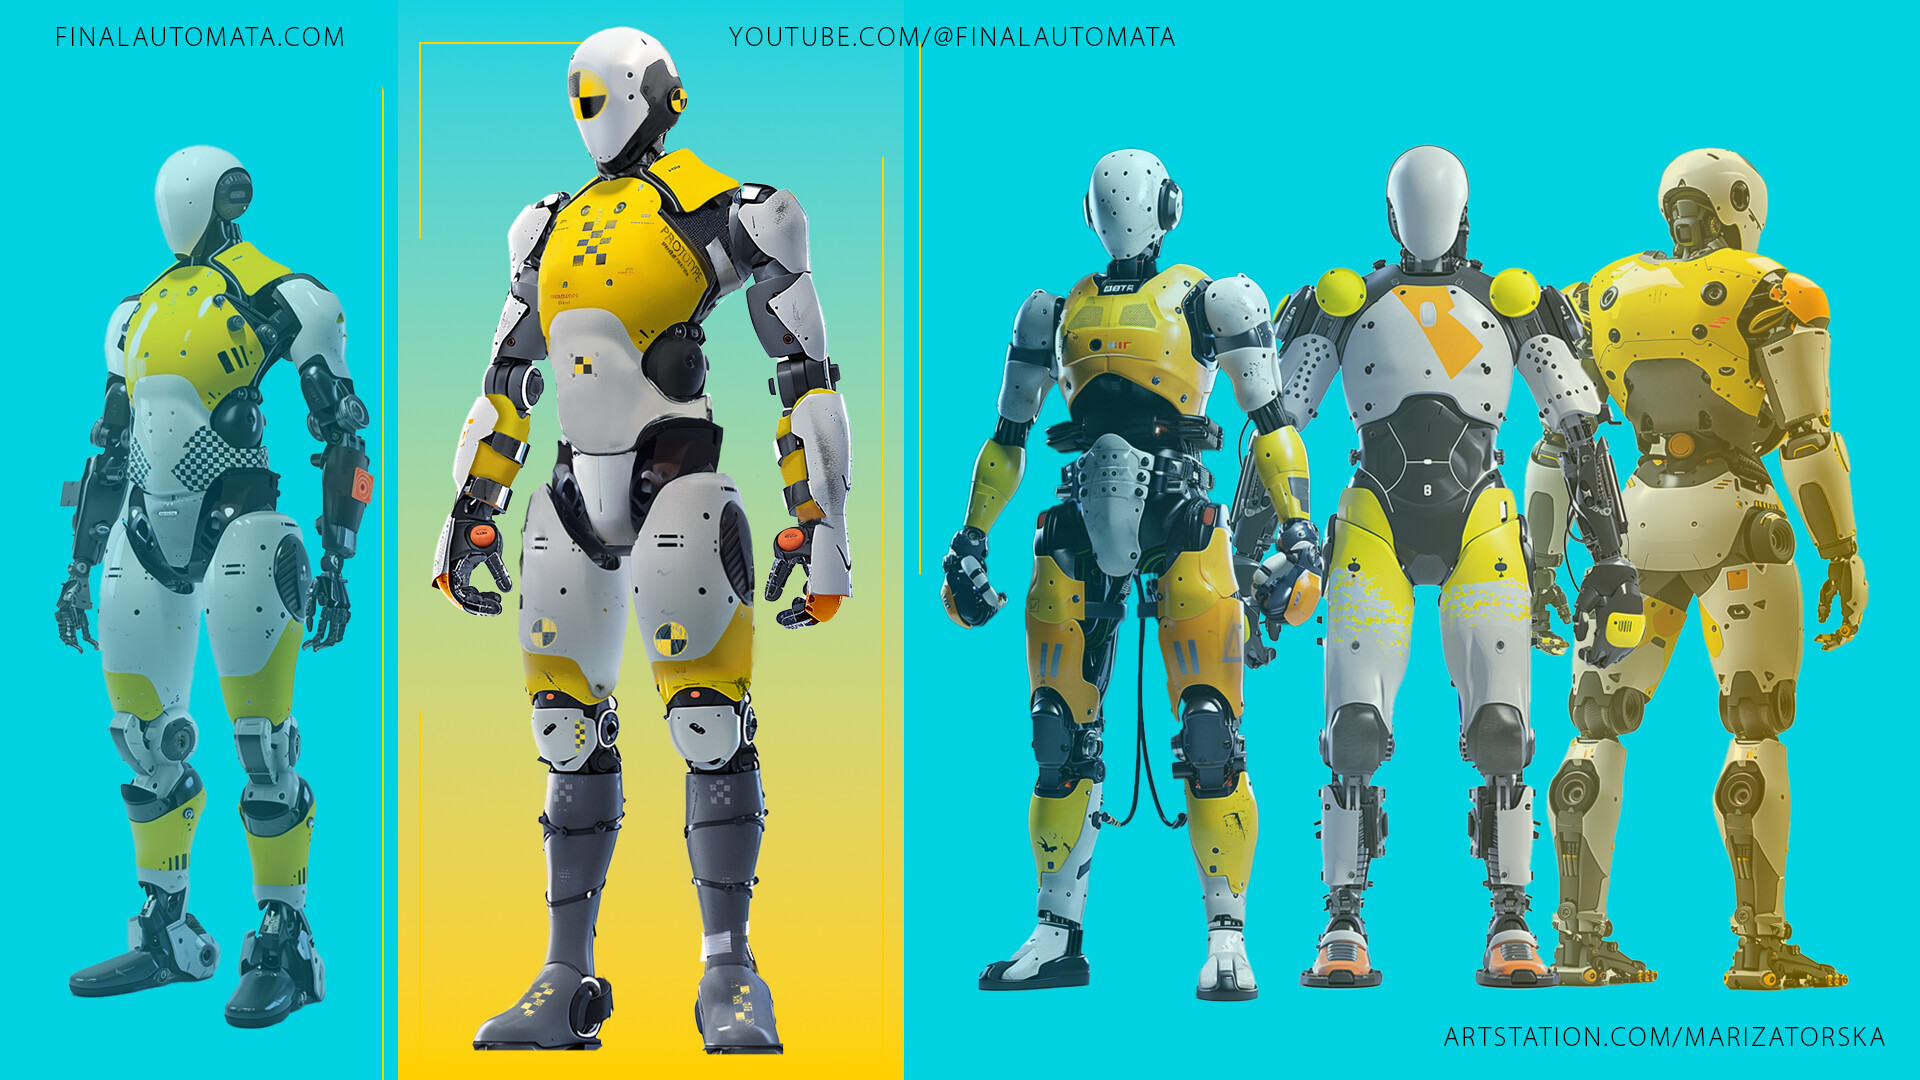
FINAL AUTOMATA is a fighting game with AI-controlled, physically simulated robots. We're a team of two: an Engineer and an Artist (me). Inspired by AI tech, we aim to bring this project to life with limited resources. 

I use generative AI tools and traditional 2D/3D techniques from my 10+ years in game dev, while my partner uses reinforcement learning and simulations in Unity3D to program and animate the robots.

What's in this update:

  • 🤖Creating concept art for a robot using AI tools along with "traditional" pre-production techniques
  • 🎨Learning the principles of Character Design and how to create a cohesive art style for a game

I've been diving deep into generative AI tools to amplify the art production for our game. After my previous tests https://www.artstation.com/artwork/aoWQnX & https://youtu.be/QSkYUFzgCLE  I wanted to push the tools even further.

Creating Character Concept Art with MidJourney and Photoshop

1. 📚 Collecting references and figuring out which elements make the robot more appealing.

2. 🎨Using Midjourney to generate ideas and mix styles. I aimed for an interesting, fresh, and cool style for the robot. I generated hundreds of images, refining the prompts and reference images.

3. 🛠️Refining the final concept in Photoshop using kitbashing and matte painting with images generated in Midjourney. I also heavily used Photoshop's AI generation tool to create separate pieces. In the latest Beta version of Photoshop, it's convenient to upload the reference image for generation and upscale it to get the best results.


📂 Resources and 🔗 Links:

Tips and tricks of Midjourney https://www.youtube.com/@FutureTechPilot

Photoshop Ai generation with reference image https://www.youtube.com/watch?v=BUlEW9CG73w

Learning the principles of Character Design and how to create a cohesive art style for a game:

Creating an indie game from scratch means you have to do it all. Not only do you develop the assets, but you also have to decide what to develop. To put on my Art Director hat, I first need to learn how to wear it.

First, I turned to ChatGPT to break down the principles of worldbuilding and designing appealing characters. This gave you a rough overview of the topics I need to learn.  Then, I went to YouTube and Artstation Learning to dig deeper.

📂 Resources and 🔗 Links

The Art Direction of Street Fighter V: The Role of Art in Fighting Games https://www.youtube.com/watch?v=EDlbJdmo7KE

Art Direction Bootcamp: Building a Visual Threshold https://www.youtube.com/watch?v=eLnvEwo4M8Q

Stay tuned for more updates - next, I will create the 3D version of this handsome robot 🤖.

I hope my journey will be inspirational for you. Feel free to start a conversation in the comments, and if you like, follow me on Instagram 📸 https://www.instagram.com/marizatorska/ and our game's YouTube channel 🎮 https://www.youtube.com/@finalautomata


Report

Image to 3D - 3D AI generation for GameDev Experiment

Tutorial / 12 April 2024

I experimented with AI-generated 3D models to check their usability for FinalAutomata (https://www.youtube.com/@FinalAutomata) , where we need to create numerous characters (robots). Here are my key takeaways:

The fidelity and quality of the output are still lacking, especially for Hard Surface assets/characters. Here's what I found useful:

  • Using higher quality input images (with clear forms, like product design concept art or clear front lit renders) results in better outcomes.
  • Text prompts generate better results than image-to-3D conversion.
  • Segmenting your assets into parts and generating them separately allows for more detailed results for each part.
  • Retexturing with AI is a nice feature that can quickly fix imperfections in the generated color textures.
  • While AI offers retopology, it tends to eliminate details.
  • AI-generated models can be used (almost) as-is for stylized projects, particularly for props and some characters.

My approach involved:

1. Image/concept generation:

  • I used Dall-e because it allows tweaking the results using natural language. For my next experiment, I plan to combine MJ, Krea.ai, and StableDiffusion for more controlled results. 
  • Editing in Photoshop with AI-generated feature allows for precise fixes and inpainting.

3. Generating 3D from images:

  • CSM.ai worked best for me as it allowed segmentation of the front and back of specific robot parts, providing the closest likeness to the reference/concept art.
  • Some parts, like robotic eyes, separate joints, or kitbash parts, can be generated using Tripo3d.ai, 3DAiStudio.com, and Masterpiecex.com. Each generator offers slightly different results.

4. Geo Cleanup:

  • I performed retopology in Blender (using QuadRemesh or Blender's remesh tool) to fix holes, etc.
  • I smoothed in sculpt mode with the Filter Brush, added creases with the Pinch Brush, and polished with Flatten.
  • I then baked the diffuse (AI-generated color map) onto the new retopologized UVed mesh.

4. Retexturing and adding normal map details in Substance:

  • I used SubstanceSampler to create PBR materials from AI-generated color maps.
  • MJ helped generate cable textures, which were turned into PBR materials in SubstanceSampler.
  • I also used hard-surface alphas from JRO to add extra height details.


Report

Rendering My Goodbye: A New Chapter Begins

News / 03 September 2023

It's been an incredible 10-ish year journey working as a CG Artist, and I'm excited to pivot and bring my next vision to life. I've gained immense respect for all the artists in this industry. The community is incredibly supportive and truly innovative, always eager to create new worlds and tackle (many) technical challenges along the way.

Coming from a marketing and sales background, diving deep into the creative and technical aspects was initially tough for me (especially when it meant grinding away for dozens of hours daily just to complete anything). But this journey has boosted my confidence to new heights, convincing me that I can be whatever I choose to be.

Nomading through not just territories (I've been a digital Nomad for more then 10 years now) but also different professions gives me the superpower to live multiple lives and see the world from various perspectives. Today, it's easier than ever to access any kind of knowledge right at your fingertips. Isn't it amazing that humanity spent centuries mastering color theory and the rules of perspective, and now you can grasp these concepts in just a two-hour online course?

P.S. Just a heads-up, I won't be updating or supporting my existing CG assets moving forward. Unfortunately, that also means I won't be able to respond to support requests. Thanks for your understanding!

I have also put together a free quick cheat sheet on how to handle Metahuman hair in UE5. Hope it comes in handy for those of you just diving into the subject: https://www.artstation.com/a/30792608

Report

Why I suspended my Artstation Pro account and then reactivated it.

Article / 16 April 2022

As you know there's a war in my home country and my parents, my beloved ones are not safe. My personal fight differs from the fight many Ukrainians are having right now on site. And I want to share some of my thoughts on Artstaion's apolitical position, hate towards people from Russia, art that speaks to our hearts in difficult times, and what we, as artists and members of such a big worldwide community can do to make a world a better place.

After a few cases of Artstation bringing down artworks depicting Russians as nazis I am, being emotional, suspended my Pro account and closed my Artstation store. Even my passive income from the store meant a lot to me.

I admit that I blamed everyone who was not emotional as me about all the horrible things that the Russian army did to my family and friends. Especially those who have a big platform and don't use it to speak to brainwashed people who support this war or didn't close their service to the Russian market.

I canceled Artstation. But after a month or so I received my latest payment and sent this money to the 280days fund who supports pregnant women and newborns in Ukraine. And after that I bought some models from an artist from besieged Kherson city, hoping it would help in some way.

All these things would not be possible without Artstation. I returned to their statement, and read it again. And it had more sense to me than the first time I read it. AS clearly stated that to abide by laws in Europe they can not allow swastikas other than in historical context. 

The beautiful work by Miguel Iglesias depicting svastika on Putin's head will be remembered as a historical piece that spoke to many during these hard times. And yet, we would have to wait for some time when international laws catch up to the reality of things today when Russian aggression towards Ukraine is clearly fascist.

AS also stated that they support Ukraine and they are part of Epic's family who donated money for humanitarian aid in Ukraine.

Why I decided to reactivate my Pro account and revive my AS Store?

Because I am not afraid to admit my mistakes.

Because I believe that there are better ways to stream my anger and hate than to blame platforms that support artists in Ukraine and all over the world.

Because I believe that hating Russians won't help the situation. I won't be having any business with them for sure, but I do not need to spend my time or time of AS moderators to talk shit in the comments. These people who justify war, any war, will not have a penny of my attention.

Because I believe that each thought full of hate can be converted into opposite action: supporting my Ukrainian fellow artists on Artstation. Or creating artwork and making money to be able to donate some.

Because I believe that raising awareness of what is really happening in Ukraine is not the same as talking shit about Russians on the platform. The latest is just escalates the situation. We can clearly see how it is easy to turn angry people into a destructive forces. The borderline is too thin.

And I encourage everyone to stop spending your time on any communication with brainwashed people. There's no point to flood the world with our hate. Humane values are not something you can teach in one comment. Believe me, I and my fellow Ukrainians tried to do in since 2014. No results as you can see.

Many of us are full of hate and anger. But it's our personal choice to spread it further or direct our energy to change the situation and help people who are in need.

Thank you for reading and thanks to all of you who purchased my Hair Asset "Save Lives". I already donated $300 to the fund (I had $100 in sales from my AS store and $30 from other platforms).


Report

Real-time Hair Creation Workflow

Article / 14 January 2022

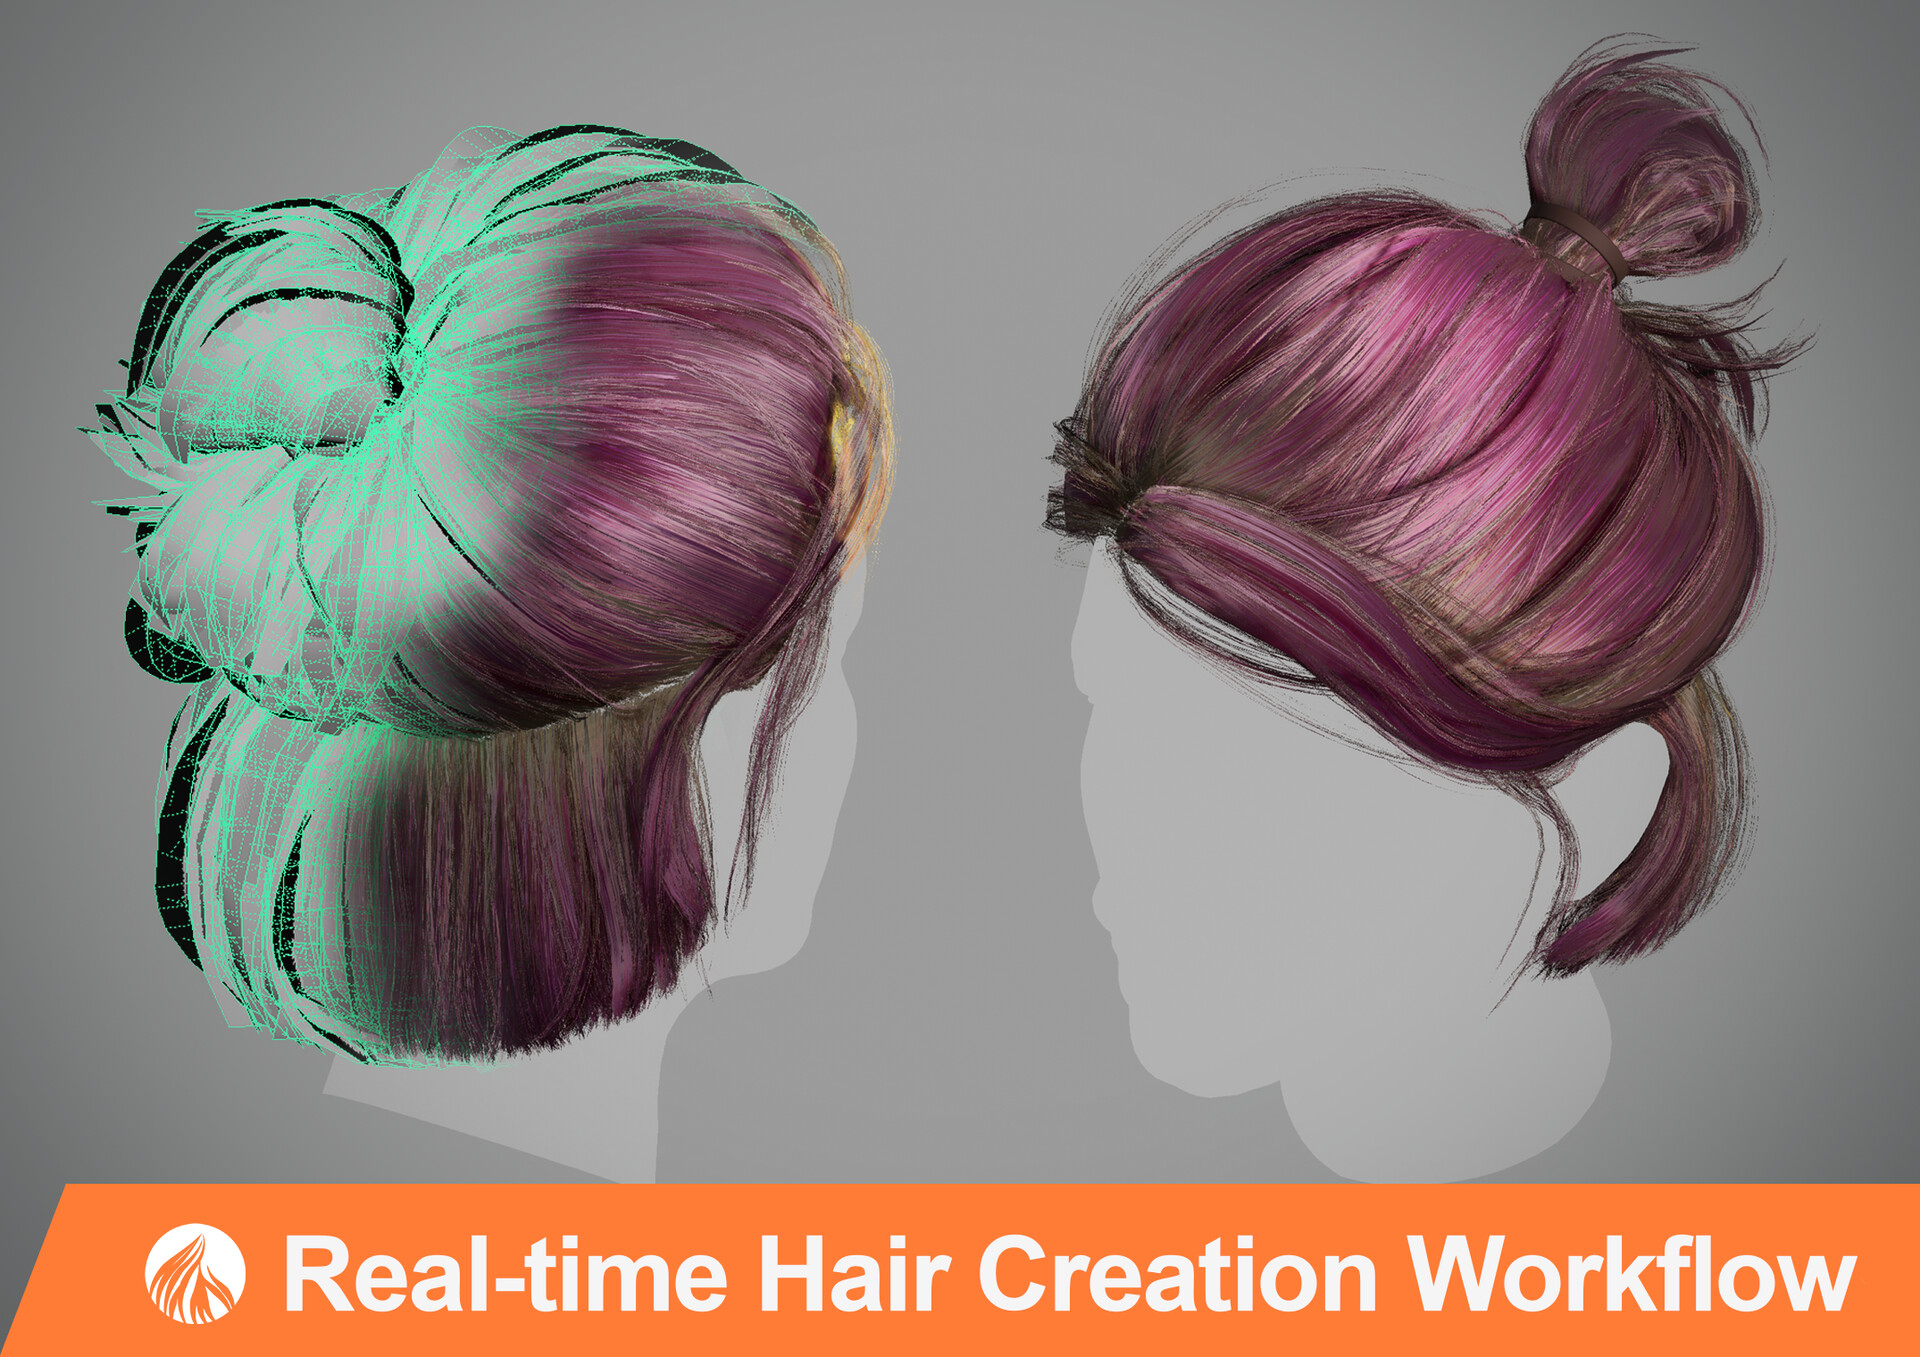
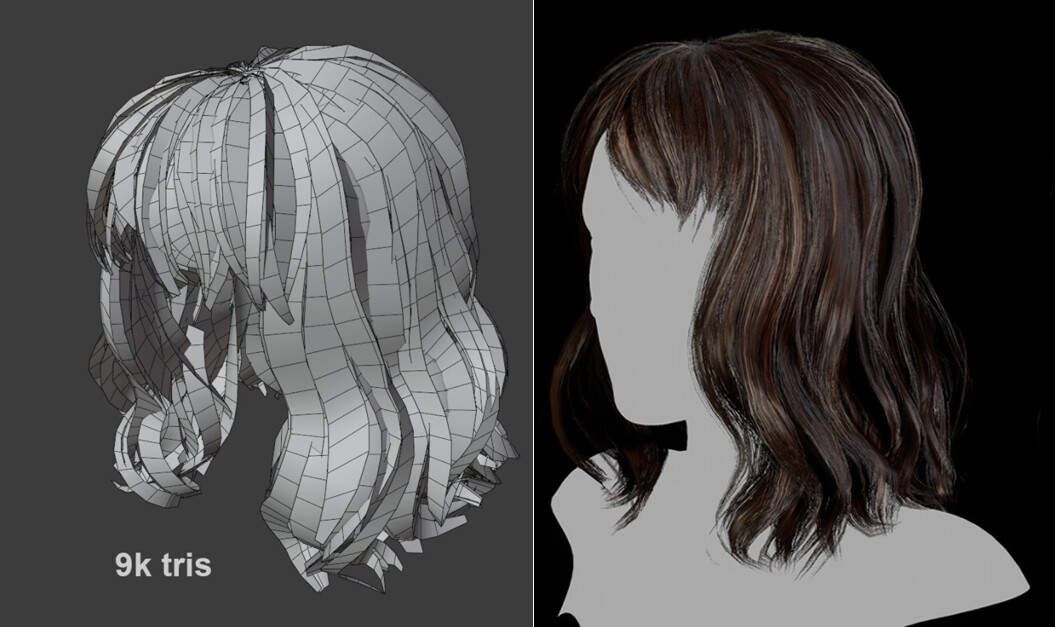
When aiming for realistic-looking hair for games, there are two options: polygonal hair created of hair strips (cards) and strand-based hair (since UnrealEngine presented the new hair system – UE4 Real-time Hair Advances – fxguide. Even with the new tech advances, strand-based hair still is very taxing on the real-time rendering, so most of the game developers, both of AAA and indie scale, choose the hair cards workflow, and usually keep the hair model in a range of 4k to 20k triangles.

capture from Robin Taillandier & Jon Valdes – Every Strand Counts: Physics and Rendering Behind Frostbite’s Hair

Though there are a gazillion ways to make hair look good in the game, a few common workflows are currently used for real-time hair production. They vary depending on the desired rendering quality, polygon budget and the restrictions/options of the shader in the game engine of choice.

Hair for games is made by creating hair strips (so-called hair cards) to represent the hair strands and applying the alpha texture on them. Placing hair cards layer by layer simulates the mass of the hair. The higher amount of hair cards gives the hair a more realistic look but makes the hair model expensive. Thus artists try to achieve the best result by spending less on cards amount.

Example of the Hair model made of Hair Cards and Final Render in UnrealEngine4

Generally, the game hair production process includes these steps:

  • Creating hair textures
  • Placing hair cards
  • Rendering hair (shader setup)

Which software to use for creating game-ready hair?

Actually, you can use any 3D modeling software. Maya, 3dMax, Blender and Zbrush, each offer great tools to back you up with the texture creation and laying hair cards. The workflows differ, as you will read further in this post, but the basic concept is the same.

I would suggest using the 3D program you are already familiar with. If you have more than one under your belt, take a look at the numerous tools and plugins out there for creating hair. For example, being a Maya user I learned Blender just to be able to use this awesome Hair tool, which sped up my hair card placement process in times.

My workflow of creating hair for games

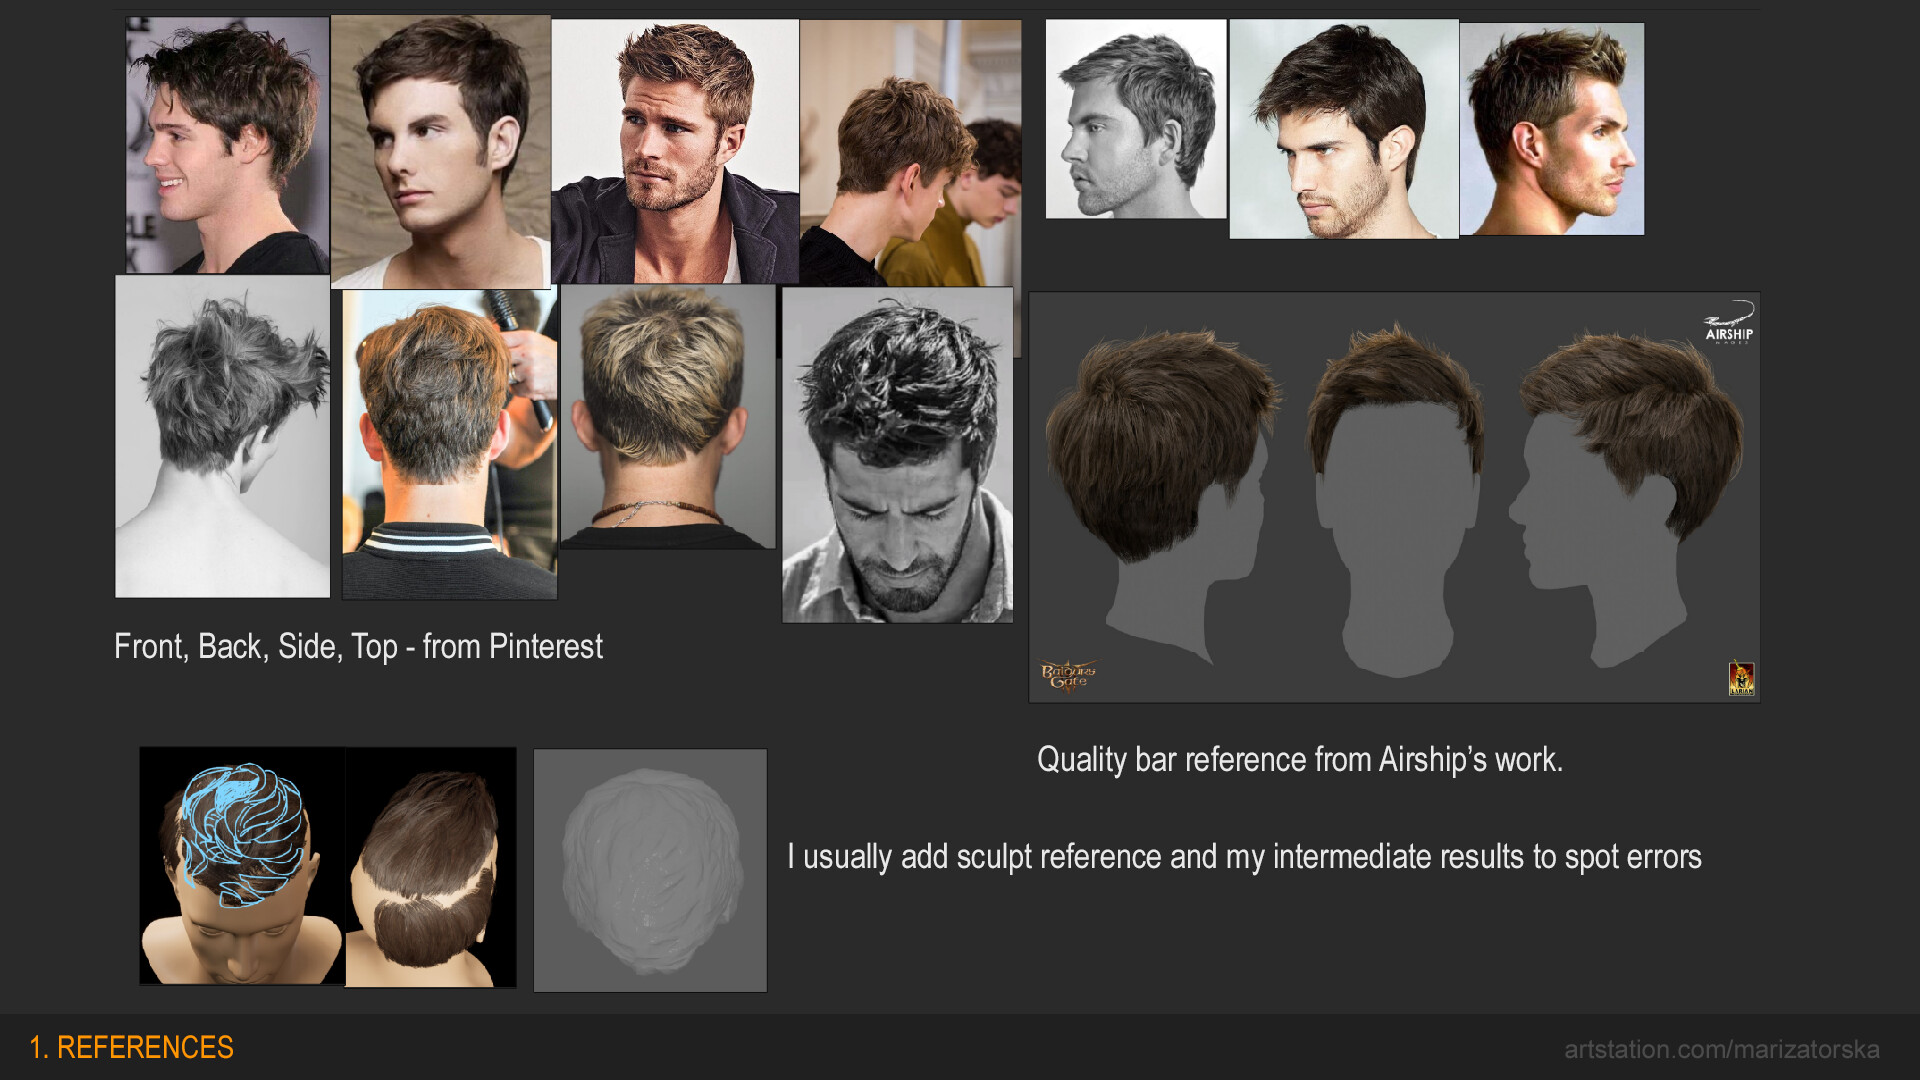
1. References and Planning

Placing hair cards is quite time-consuming and tedious, so it is crucial to plan the process ahead to save time.

Planning involves a profound understanding of the structure of the haircut you making. Gather references with the front, back, side, and top views of the hairstyle and answer these questions:

  • How does the hair flow? In what direction?
  • What is the shape of hair parting?
  • Curly or straight? What is the level of dispersion? Are there a lot of messy strands? Is it thick or thin?

Understanding every aspect of the hairstyle that you are creating allows you to choose the most effective workflow, save time, and achieve the best results.

Reference Board made with PurRef Application

2. Sculpted hair for reference

To answer these questions, I started with the sculpted mesh in ZBrush. I would further use it as a 3d reference in Maya to place cards.

The sculpted hair doesn’t need to be detailed, I kept it simple and low poly, I’ve spent 20 mins on it max. The main goal is to design the hairstyle shape (the silhouette), establish the hair strands’ flow, and estimate the width of the hair cards.

Sculpted hair for reference

3. Create the hair texture

Check out my post about 8 Ways to create the textures for real-time hair.

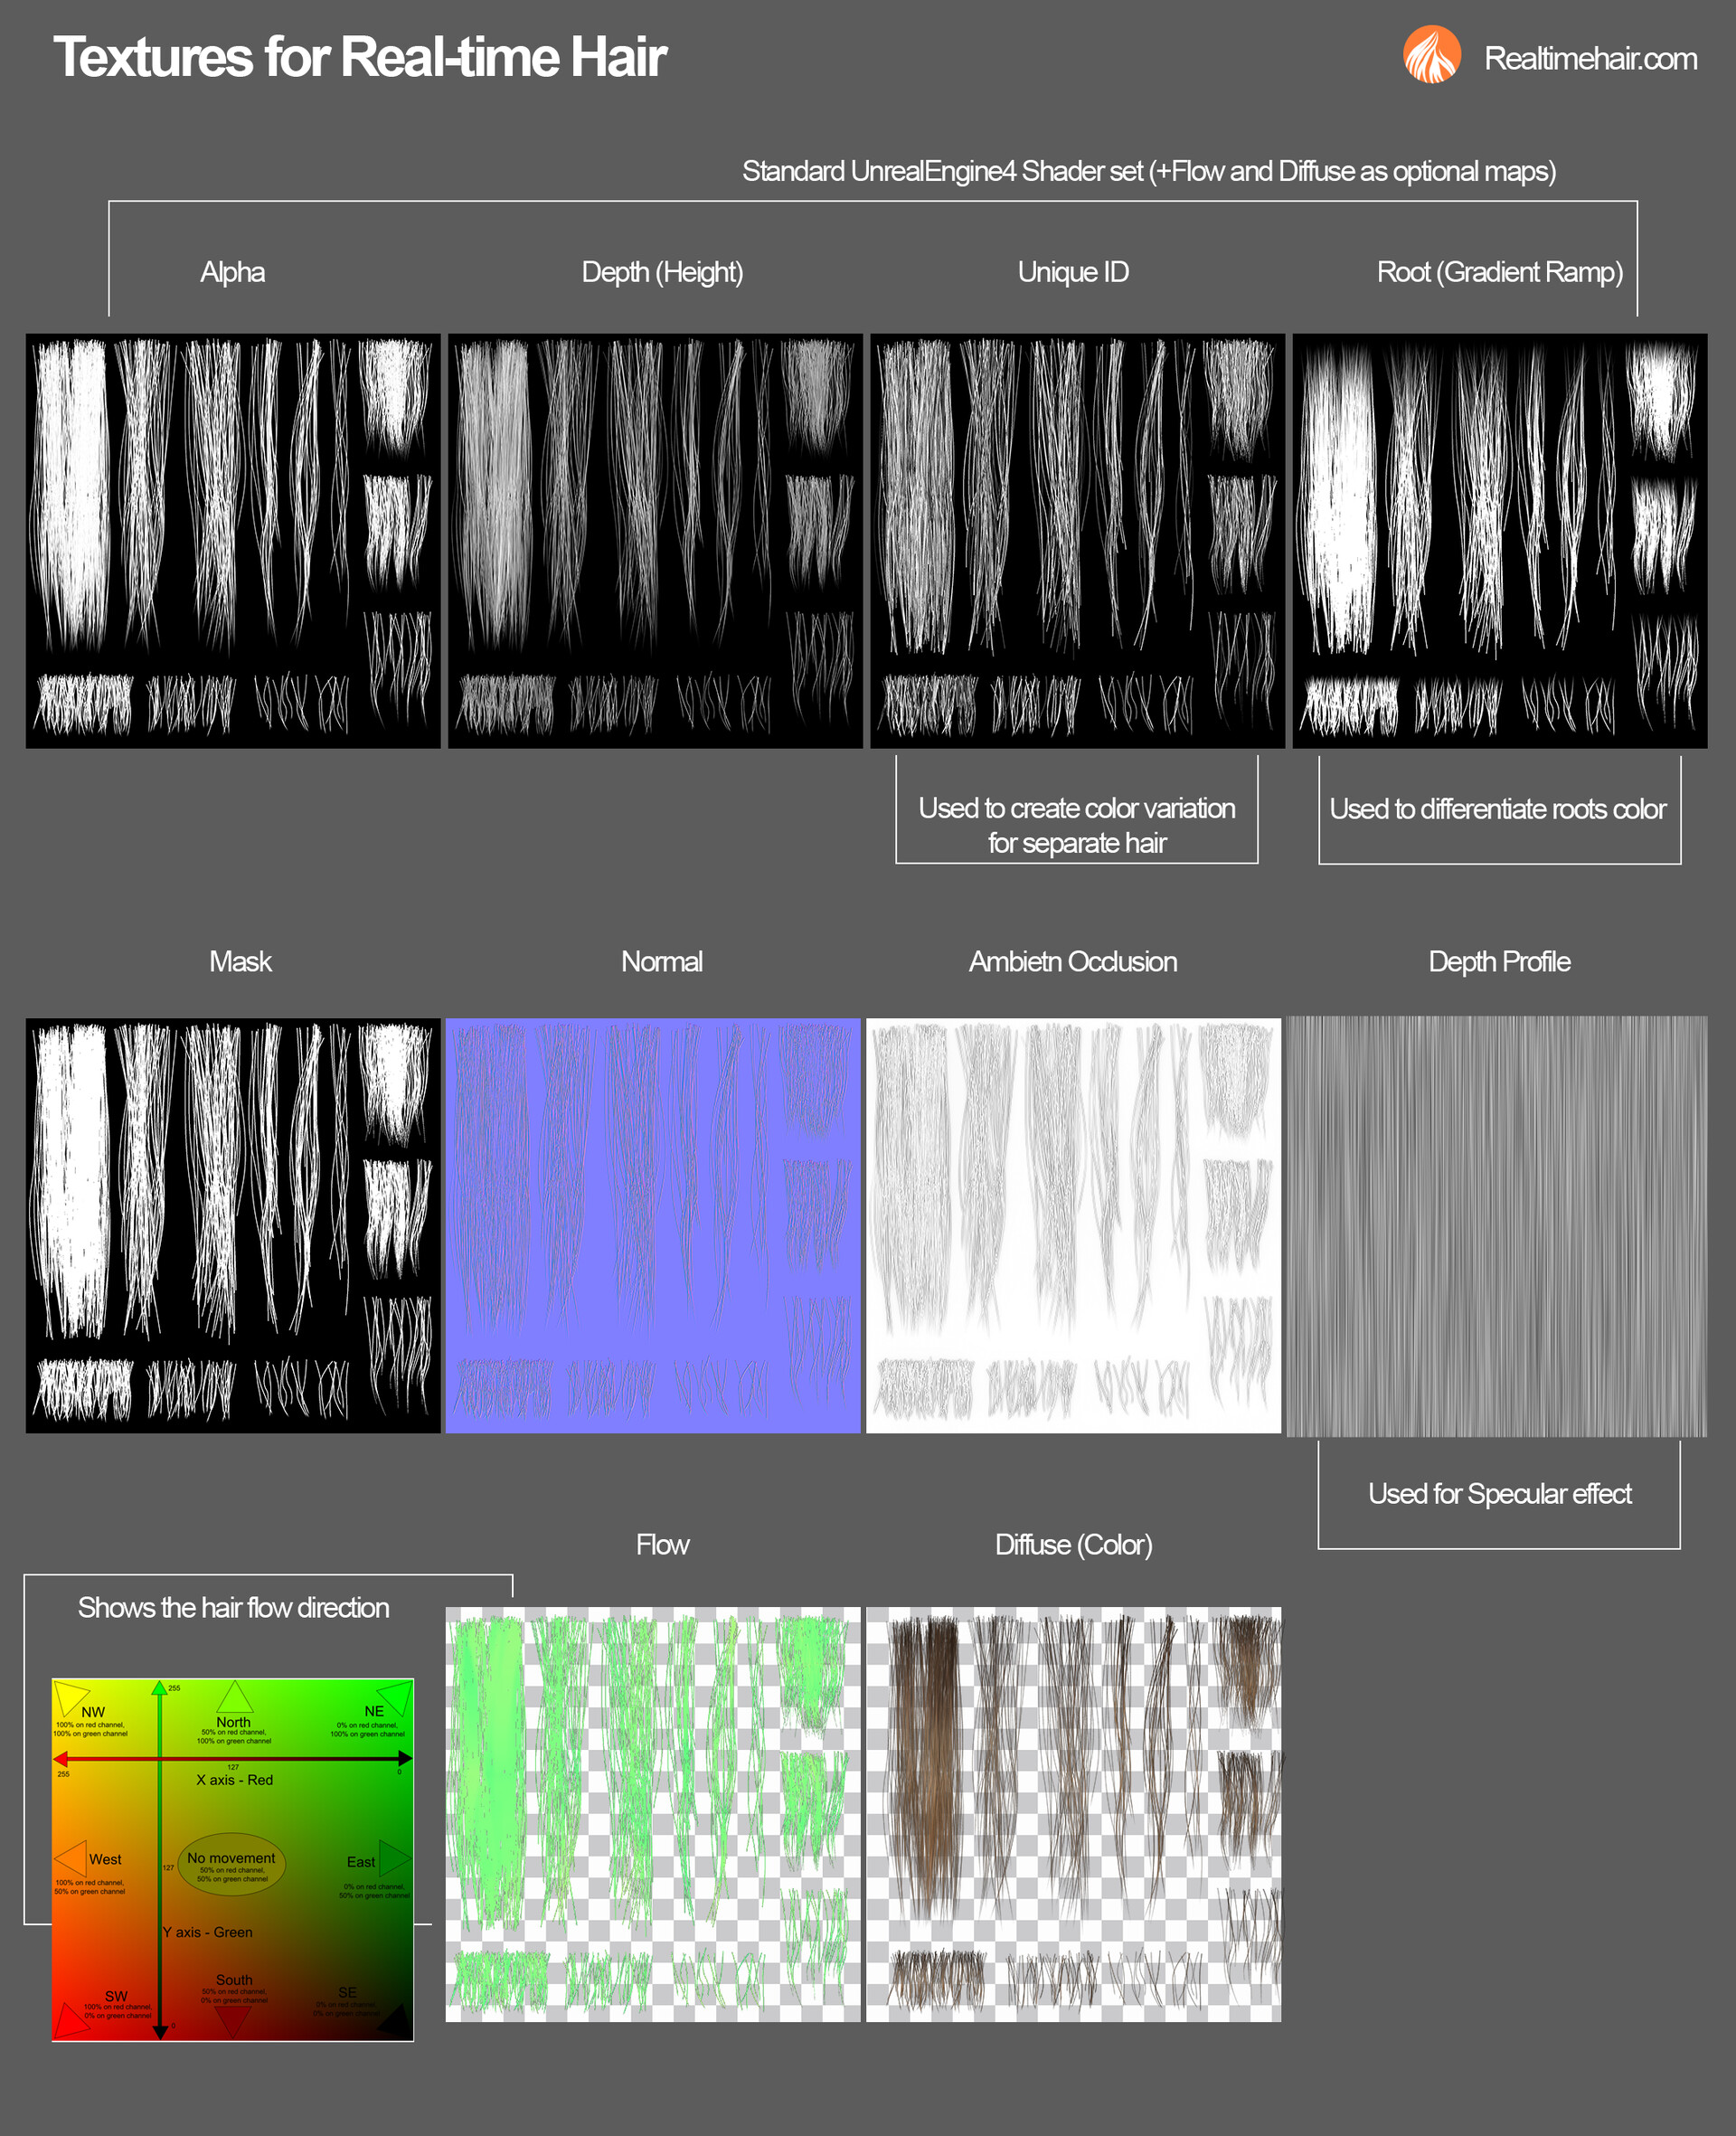
Reference images helped me understand what kind of hair strands fit this hairstyle best. Different game engines use different shaders (material properties) for real-time hair. Check with the technical artist/game programmer which texture maps are required. For example, UnrealEngine 4 uses these maps:

Alpha, Depth (or Height), Unique ID and Root (or Gradient Ramp). Diffuse (color) and Flow maps are optional.

Other shaders can require: Mask, Normal, Ambient Occlusion and sometimes, Depth Profile (when there’s no baked Height Map).

Textures for real-time hair

There are different ways to create the hair texture, the most common is to bake the generated xGen hair (in Maya), Hair Particles (in Blender), or FiberMesh Hair (in Zbrush), using the native application, Marmoset or xNormals. There are also a few tools that offer procedural generation of Hair Texture.

I created my textures using the HairTG Hair&Fur tool for Substance Designer.

Check out my post about 8 Ways to create the textures for real-time hair.

When creating the hair texture, I followed these principles:

  • Create hair strands variation – to avoid evident repetition in texture across the hair model.
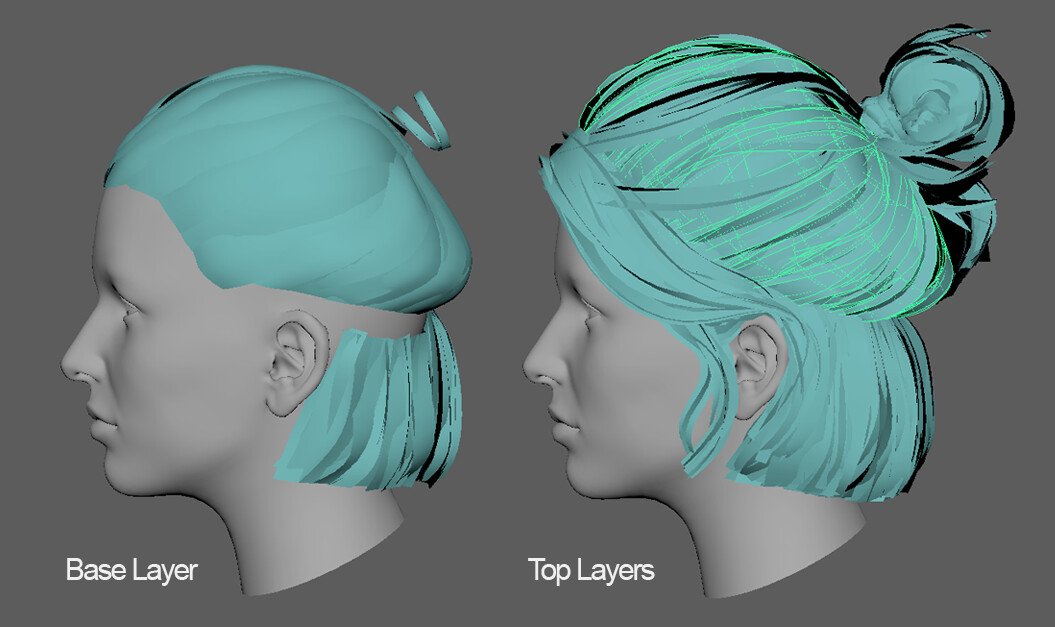
  • Create clumps with different hair amount – density. I tend to use cards with a more dense texture as the base layer and place them closer to the hair scalp. On the top layer, I use the cards with lower density and some distinctive hair variations (like waves or gaps between strands). Here’s a great breakdown of which strands to use on which layers by Jansen Turk https://www.artstation.com/artwork/YaD6oP
  • Keep each strand the same width – or have few types of width. Make hair cards that are closer to the scalp wider, and others thinner – but the same width for each group (layer). This will help easily switch UV space for hair cards (to use texture variation where it is necessary) and keep the rendered hair thickness the same for all cards.

Some hairstyles, mostly short male hair require the creation of hair cap mesh and texture. Check out my video of how to create one.

5. Place the hair cards.

Check out my post about the 13 workflows to place hair cards for real-time hair.

The lower your polygon budget, the more precise you should be about placing hair cards. I found that manual hair card placement works best for me when trying to get the mesh done under 10k tris.

For meshes under 4k tris, I use the Quad Draw tool (in Maya) to create the Base (Cover) layer of cards over live sculpted mesh (sculpted in ZBrush). Then I manually put the other layers of cards. I also like to use Blender Hair Tool to lay down base layers – it’s super fast. I just convert the grid mesh (which has a form of a head) and the tool generated the hair cards cover layer. Check out this video.

Hair Cards Layering

Before placing cards, I considered the following:

  • When you work with low poly hair (under 6-8k) the best result give the manual placing of hair cards. For higher tricount, you can play with different tools and automated workflows, like generating hair curves with xGen in Maya and then converting them into ribbon meshes (hair cards).
  • Consider how close the player will see the character’s hair, from what angle (is it a top-down view, or a third person) To achieve the best result, make the hair look good from this particular angle/zoom. 
  • Setup the shader/hair material in the real-time engine and frequently check how the hair mesh. I usually place the first layer of cards and check the mesh in the engine. It allows me to spot the mistakes/see-throughs/gaps/texture repetitions and fix them before the card structure becomes complex.
  • If you are using a cap mesh, it is good to plan a transition between cap texture and cards using cards with low-density hair.

Thank you for reading and check out my Store page for Hair Models!

To get 30% discount use 30OFFHAIR coupon code.
Report

Create the hair cap using Maya and Marmoset - Process Video

Tutorial / 08 February 2021

I recorded a video of creating the hair cap mesh for game characters using Maya and Marmoset.

----

The Hair Cap is basically the mesh that has the shape of the character's scalp, and plays a role of a hair coverage layer and placed under the hair cards. It's most useful for short hairstyles, which have buzzcut or fade.

I'd like to mention Jansen Turk's work, he is an amazing groom artist and I am actually recreating his workflow of making the hair caps, please check his breakdown of real-time hair creation.

The idea of this workflow is to create hair using the Interactive Grooming tool in Maya, covert these hair to tiny splines and bake them into a low poly cap mesh in Marmoset Toolbag.

As a result, we get texture maps – Alpha, Normal, Ambient Occlusion, Depth, Id and Root.

You can bake the maps in the xNormal tool or Blender as well. Please check out my blog post about other workflows of creating the hair caps for characters.

Check out my video and let me know if you have any questions in the comments.


You can buy this real-time hair asset in my Artstation store.


Report

Placing hair cards and fitting the polygon budget for realtime hair

Tutorial / 15 October 2020

I'd like to share a few aspects of my workflow of making realtime hair - how I place hair cards in Maya and how do I change (reduce) the polygon count after the model is ready.

Step 1

I work with hair cards in a smooth preview mode. You can achieve this pressing "3" in Maya.

This gives me the opportunity to make different shapes and not overwhelm myself with a lot of polygons while tweaking the card form.

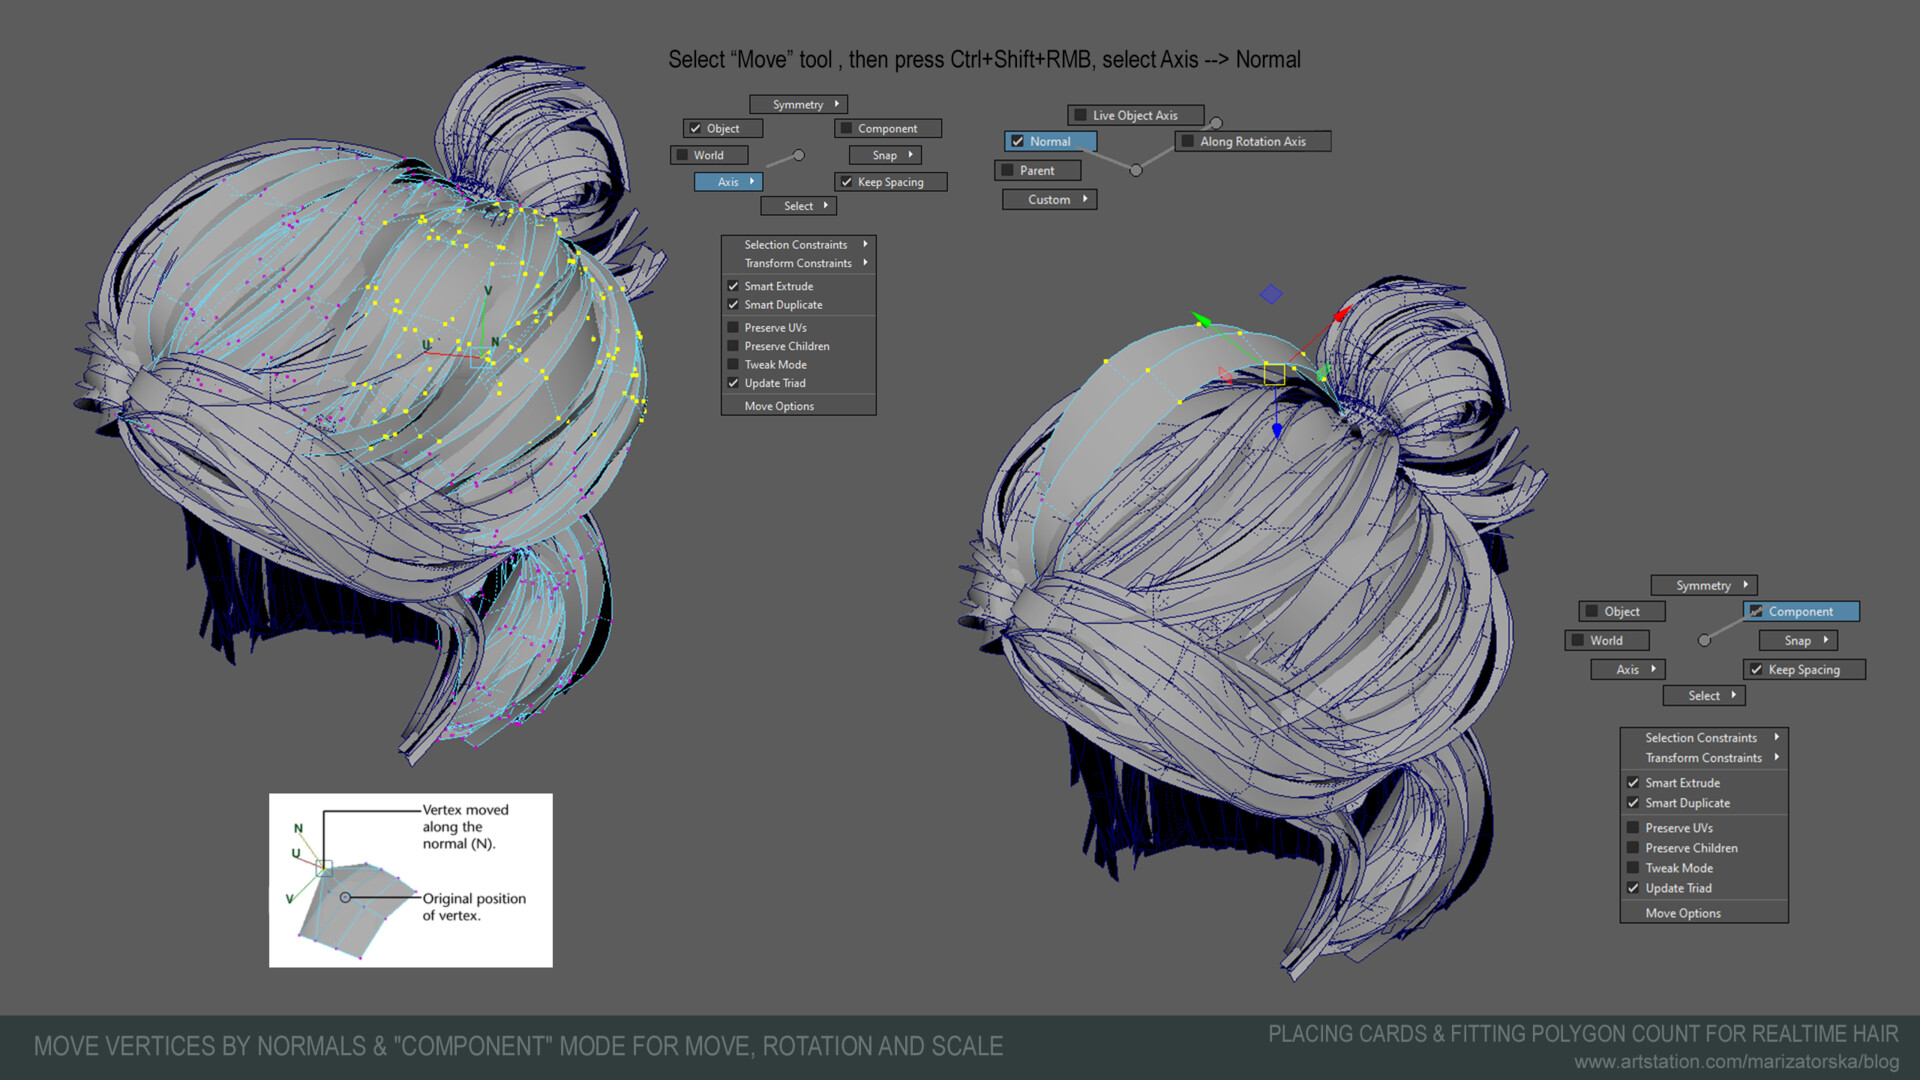
As you can see - I have only a few vertices/ edges and faces to work with. It's easy to move them by selecting only few vertices/edges using the UV editor or Soft selection ("B" key).

I usually set the "Component" option in the Tool Settings for Move, Rotation and Scale. And for the Move tool, I also use the "Axis - by Normals" direction to move the vertices. The latter changes the volume of the card.

Step 2

After I've done placing the haircards, I Combine the mesh into one piece and perform a Smooth operation.

I would go with the value "1" or "2". But you can experiment with that to achieve the best results.

After I've smoothed the mesh I press "1" to exit the smooth preview mode. And now we can see how the original hair geometry looks. It is very smooth and nice because we have quite a large polygon count.

*I also would like to mention, then when targeting specific polygon count I use the triangles count. Even my final 3d model will consist of quads - I like to count the triangles as this is what is commonly used in game engines and client's tech requirements.

Step 3

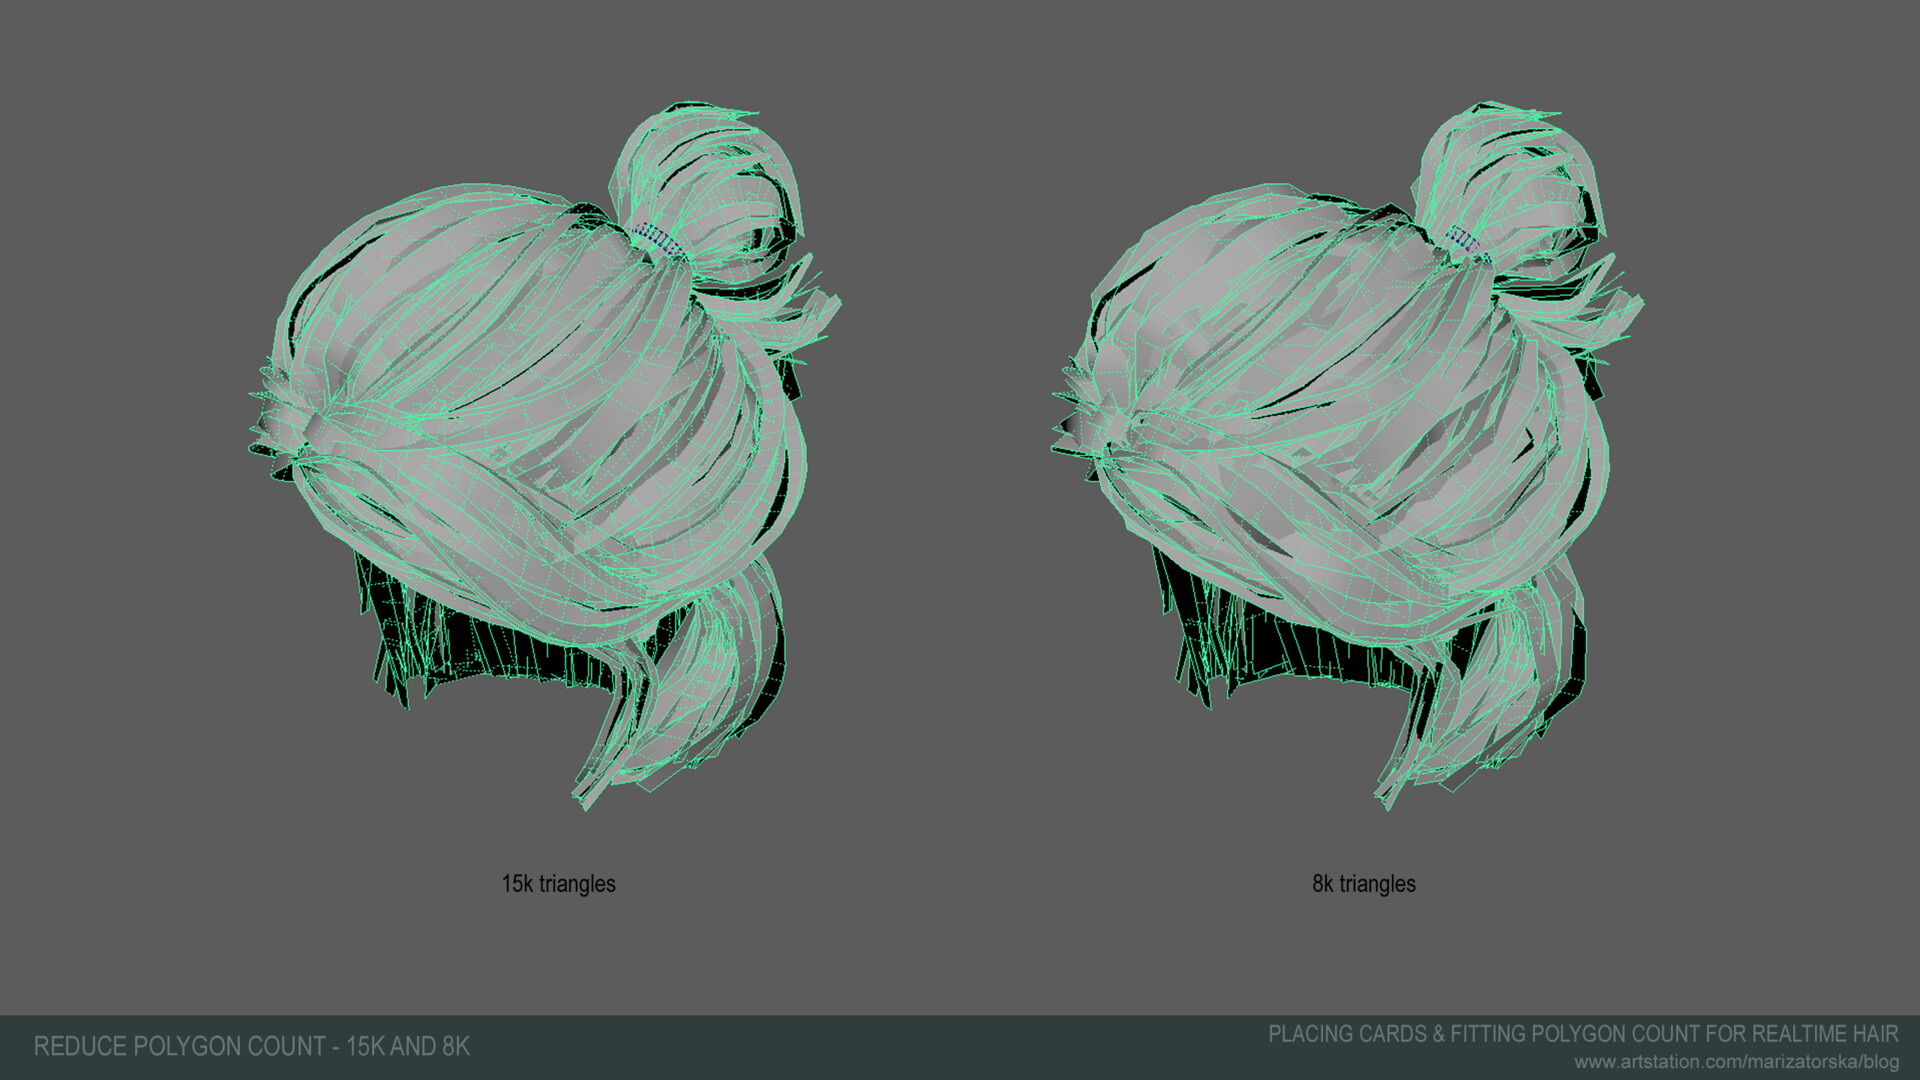
Now we can reduce the number of polygons of this mesh to fit our goals.

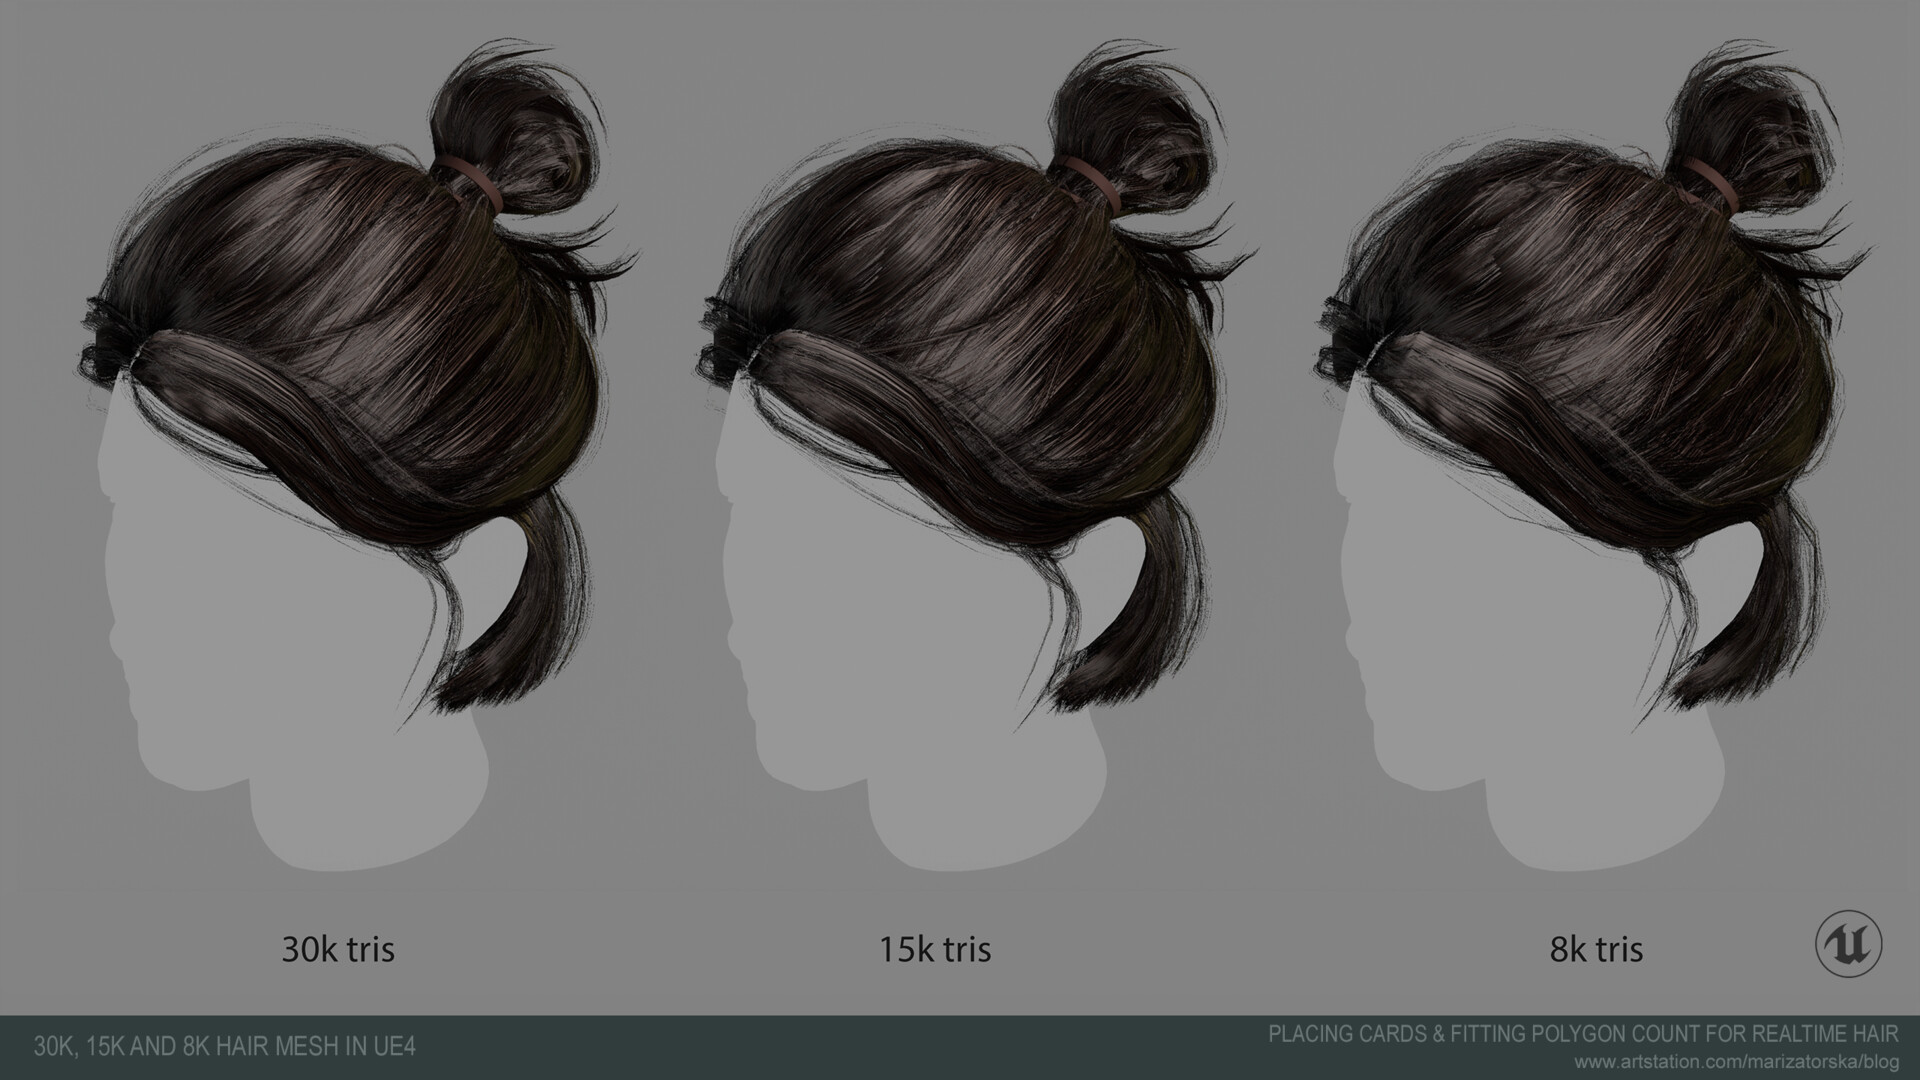
Of course, I won't be able to make this model look good in 5k triangles. But I can definitely have a few variants to look good: 15k and 30k.

There are always a few things to consider when deciding on polygon count for your mesh.

  • How close the player will interact with this model
  • What is the restriction of your game engine or graphical style? I mean, if you aim for a     photorealistic look of your game you would go for a larger polygon count. If your game is stylized - you would consider fewer polygons.

 When created this hair model I was thinking of a photorealistic project, so I would target: 15k and 30k.  And 8k just to see how bad it will look.

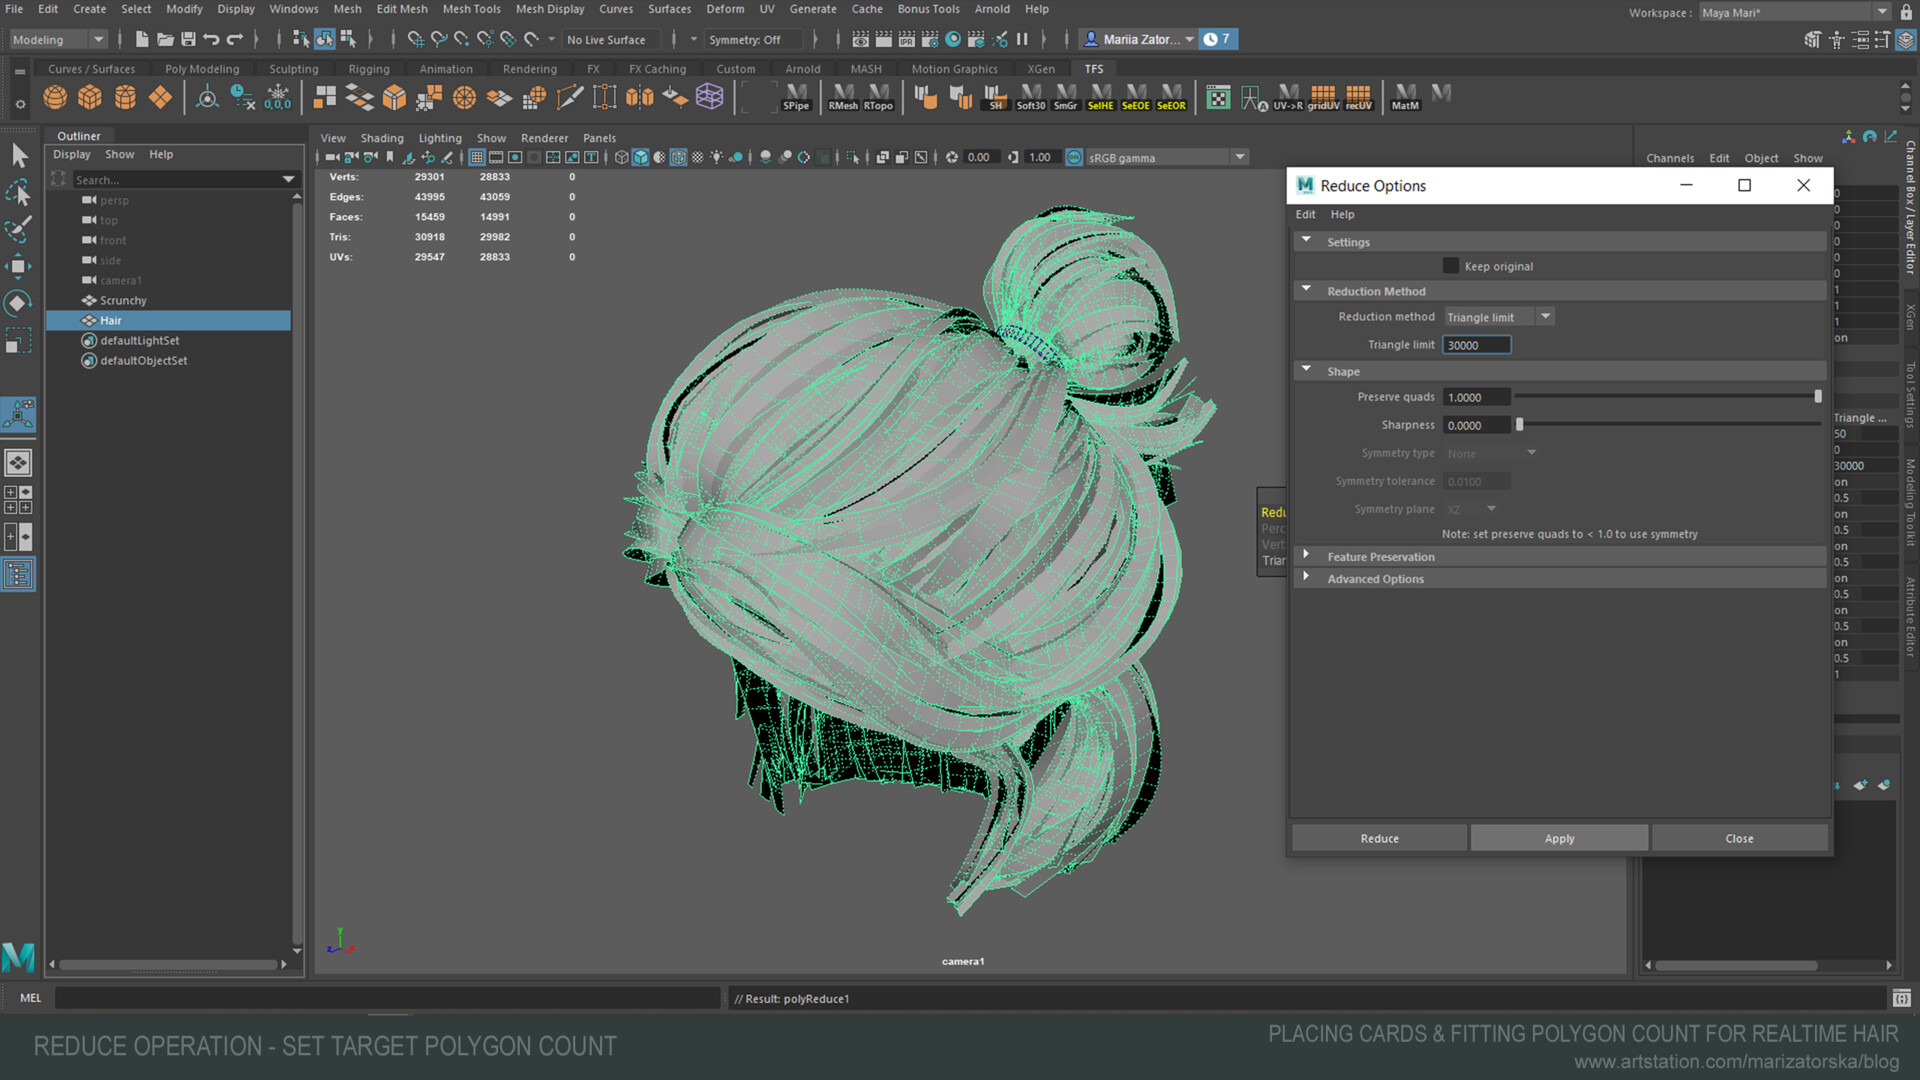
We have a solid mesh in a plane view in Maya with about 1000k polygons (I mean triangles).  Now we perform the Reduce operation.

 These are my settings. I set the target amount of triangles and leave the mesh to be in quads. We let Maya calculate it all and here we are. 


Let's see how 30k, 15k and 8k hair mesh look in Unreal Engine.


Check out other resources on this topic:

Ashley Sparling shares his AAA hair workflow and how he reduces the model's triangle count to target the polygon budget:

https://youtu.be/mzqMd9qDvjQ?t=2630


Placing hair cards in a preview mode technique showed by Sushan Manandhar

https://www.youtube.com/playlist?list=PL69P8VJxGmTsYL7FWIe2e0IK68tNew1HP


BTW, this post might be useful for those who purchased my "Ellie" Realtime Hair Asset with the source Maya file included, which allows performing the Reduce operation to fit the target polygon count.

Thanks for reading and let me know in the comments if this was helpful.

Report

Real-time Hair Workflows

Article / 29 May 2020

--------------------------------------------------------

UPDATE:

Please check my newer version of the "Real-time Hair Workflows" article on my website Realtimehair.com

--------------------------------------------------------

For the last four months, I was making the real-time hair for an RPG, The Colony Ship by Iron Tower Studio. The hair meshes had to be really low poly (up to 4k tris), and I wanted them to still look realistic. During the first month, I had researched every (I believe) workflow is out there to make the real-time hair. Though there are a gazillion ways to do anything, making hair for games brings a few restrictions in choosing the workflow like the desired rendering quality, polygon budget and the restrictions/options of the shader in the game engine

I want to share my findings and the workflow I used in my particular case. Below you will find the list of the workflows with links on youtube and articles on how to make hair texture, place har cards, and make the hair cap.

The character hair for games is made with planes/ribbons with hair texture. There are a few steps of this process:

  1. Gathering references and planning
  2. Creating sculpted mesh for reference (optional)
  3. Creating hair texture maps
  4. Making the hair cap mesh and hair cap texture
  5. Placing the hair cards on the head model


1. References and Planning 

Creating hair for games involves a lot of steps, among which the most time consuming is placing the hair cards. In most cases, to achieve the best result, it is better to place hair cards manually. So it is crucial to plan the process ahead to save time.

Planning involves a profound understanding of the structure of the haircut you making. Gather references with the front, back, side, and top views of the hairstyle and answer these questions:

-       How the hair flows? In what direction?

-       What is the shape of hair parting?

-       What is the volume – the amount of hair?

-       Is it thick or thin?

-       Curly or straight? What is the level of dispersion? Are there a lot of messy strands?

Understanding every aspect of the hairstyle that you are creating allows you to choose the most effective workflow, save time, and achieve the best results.


2. Sculpted mesh for reference


To better answer the above questions, I started with the sculpted mesh in ZBrush. I would further use it as a 3d reference in Maya to place cards.

I didn't try to make the sculpt very detailed, kept it simple and low poly. The main goal is to design the hairstyle shape, establish the hair strands' flow, and estimate the width of the hair cards. 


3. Create the hair texture

Reference images helped me understand what kind of hair strands will fit this hairstyle best. Different game engines use different shaders (material properties) for the hair meshes. So it is necessary to check with technical artist/game programmer which texture maps required. Usually, they are:

ID, Depth, Normal, Alpha, Mask, Flow, Root (Gradient ramp), Color, Ambient occlusion. Some simpler shader uses only a few – Alpha, ID, Root, Normal.

There are different ways to create the hair texture, each method gives you different maps. But you can generate the Ambient occlusion from a Normal, for example, or ID map from Depth map using Photoshop or Substance Designer.


7 WAYS TO CREATE HAIR TEXTURES FOR REAL-TIME HAIR

When I was creating the hair strands, I followed these principles:

  • Hair strands variation – to avoid evident repetition in texture across the hair model.
  • Clumps with different hair amount - density. I tend to use cards with more dense texture as the base and place them closer to the hair scalp. On the top layer, I use the cards with lower density and some distinctive hair variations (like waves or gaps between strands). Here's a great breakdown of which strands to use on which level by Jansen Turk https://www.artstation.com/artwork/YaD6oP
  • Hair length variation – for strands with high density, I use the same length hair, for low-density hair, I create length variation and tapering towards tips.
  • It is better to keep each strand the same width – or have few types of width. Make hair cards which closer to the scalp wider, and others thinner – but the same width for each group (level). This will help switch UV space for hair cards (to use texture variation where it is necessary) and keep the rendered hair thickness the same for all cards.


A FEW WAYS TO CREATE THE HAIR CAP FOR REAL-TIME HAIR


5. Place hair cards

The lower your polygon budget, the more precise you should be about placing hair cards. I found that manual hair cards placing works best for me when trying to get the mesh done in 2-4k tris.


7 WAYS OF PLACING THE HAIR CARDS FOR REAL-TIME HAIR


I used the Quad Draw tool and placed the cards over live mesh (sculpted in ZBrush) in Maya to create the base form of the haircut and manually put the other layers of cards.

Before placing cards, I considered the following:

  • The lower polygon budget, the more precise you should be about putting hair cards. I found that manual hair cards placing works best for me when trying to get the mesh done in 2-4k tris.
  • How close the player will see the character's hair, from what angle (is it a top-down view, or a third person) To achieve the best result, make the hair look good from this particular angle/zoom. 
  • Setup the shader/hair material in the real-time engine and frequently check how the hair mesh with cards looks. I usually place first layer of cards and check the mesh in the engine. It allows me to spot the mistakes/see-throughs/gaps/texture repetitions and fix them before the card structure becomes complex.
  • If you are using cap mesh, it is good to plan a transition between cap texture and cards using cards with low-dense hair.
  • Be patient :)


Thanks for reading and let me know your thought in the comments.

Report